End Devices Remote Management - Configuration Guide
1. Document Information
- Product Model: IR302
- Companion Platform: InConnect Service (ICS)
- Platform URL:
ics.inhandnetworks.com - Applicable Scenarios: Industrial / medical / kiosk / POS terminal networking, remote O&M
2. Router Overview
2.1 Product Introduction
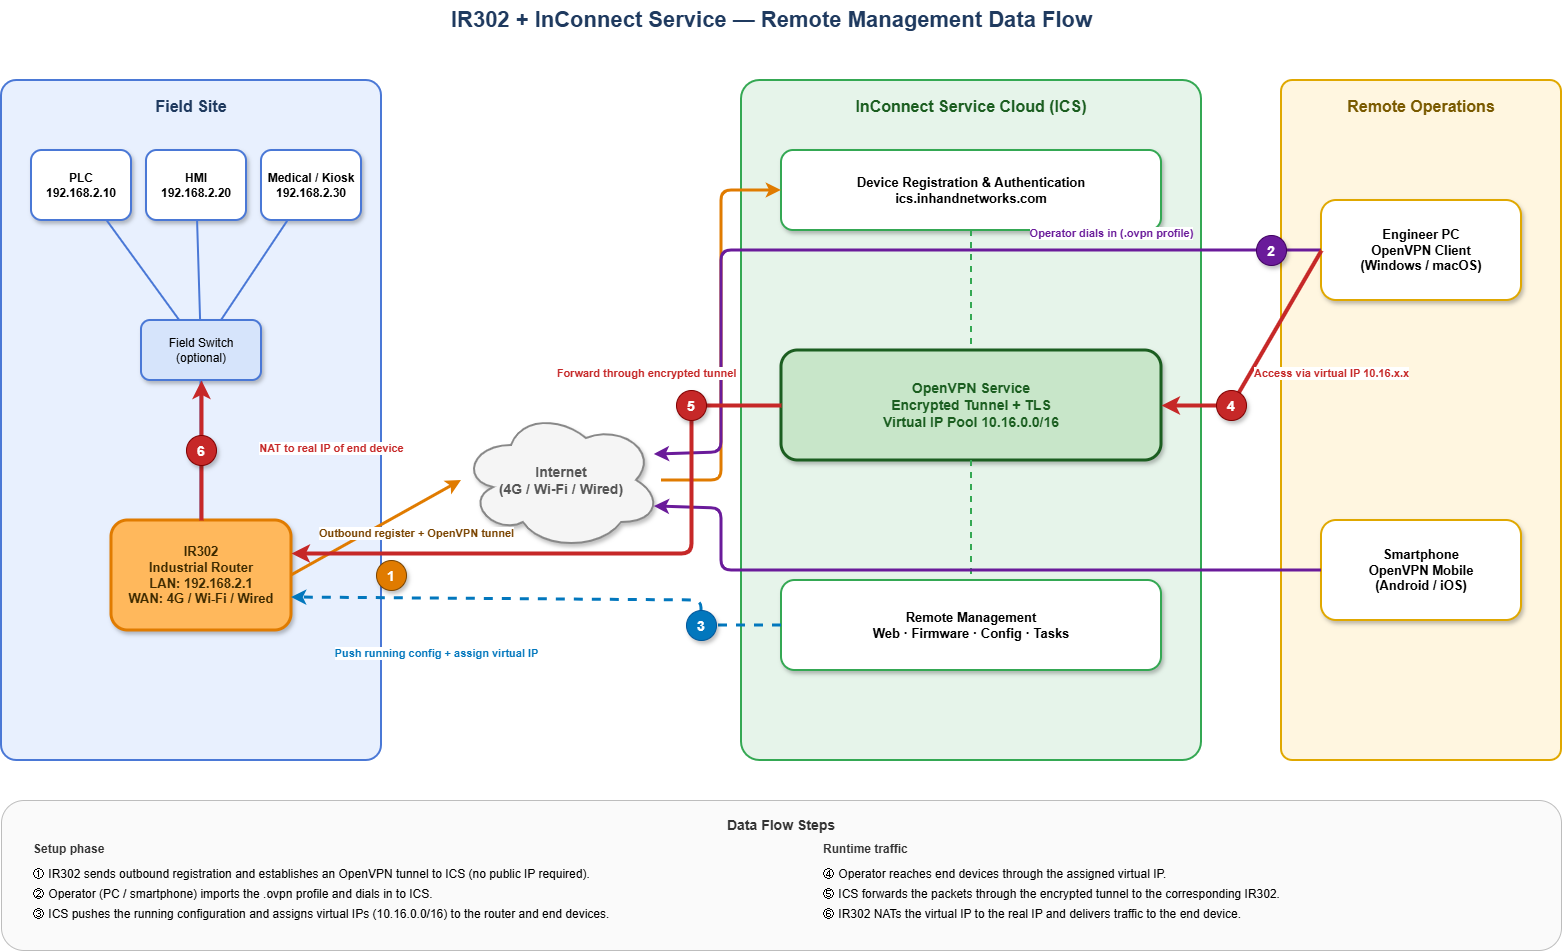
The InRouter302 (IR302) is an industrial IoT wireless router that integrates 4G cellular, Wi-Fi, and VPN technologies to deliver a simple, reliable, and secure internet connection. It is designed for unattended field communication, featuring software and hardware watchdogs together with multi-level link detection to ensure connection stability. It supports the InHand Device Manager / InConnect Service cloud platforms for end-to-end remote management, making it well suited for industrial and commercial IoT deployments.
2.2 Key Features
- Provides internet connectivity to Ethernet and serial devices
- Multi-link uplink: 4G, Wi-Fi, wired Ethernet
- Remote configuration, remote diagnostics, remote upgrade, remote management
2.3 Topology
3. Hardware Description
3.1 Appearance and Interfaces
- Power input: DC 9–36 V, reverse-polarity and over-current protection
- Serial port: 1× RS232 (optional)
- Ethernet: 2× RJ45, WAN/LAN
- Wireless: 4G / Wi-Fi (optional)
- LEDs: Power, Status, Cellular, Signal, Wi-Fi
- Reset button: restore factory defaults
3.2 Interface Notes
- Positive: V+
- Negative: V−
- Notes: reverse-polarity / lightning / grounding protection
- MAIN → 4G main antenna
- WiFi → Wi-Fi antenna
- AUX → 4G auxiliary antenna (North America models only)
- WAN/LAN → Ethernet port (can be switched to WAN mode)
- LAN2 → Ethernet LAN port (for downstream devices)
- Ground: connect to earth ground; prevents static and noise interference
4. Factory Defaults
- Default IP:
192.168.2.1 - Subnet mask:
255.255.255.0 - Web username:
adm - Web password:
123456(some batches ship with a random password printed on the nameplate) - ICS server (default):
ics.inhandnetworks.com
5. Pre-deployment Checklist
- Set the PC's IP to the same subnet as the IR302 LAN (gateway
192.168.2.1). - Connect the PC to the IR302 LAN port with an Ethernet cable.
- Power on the router and wait until the Status LED is solid.
- Make sure a working browser (Chrome recommended) is installed on the PC.
- Register an account on
https://ics.inhandnetworks.comahead of time and confirm you can log in. - Prepare the field devices to be managed; record their real IPs and set their gateway to the IR302 LAN IP.
6. Network Configuration
6.1 LAN Configuration (Static)
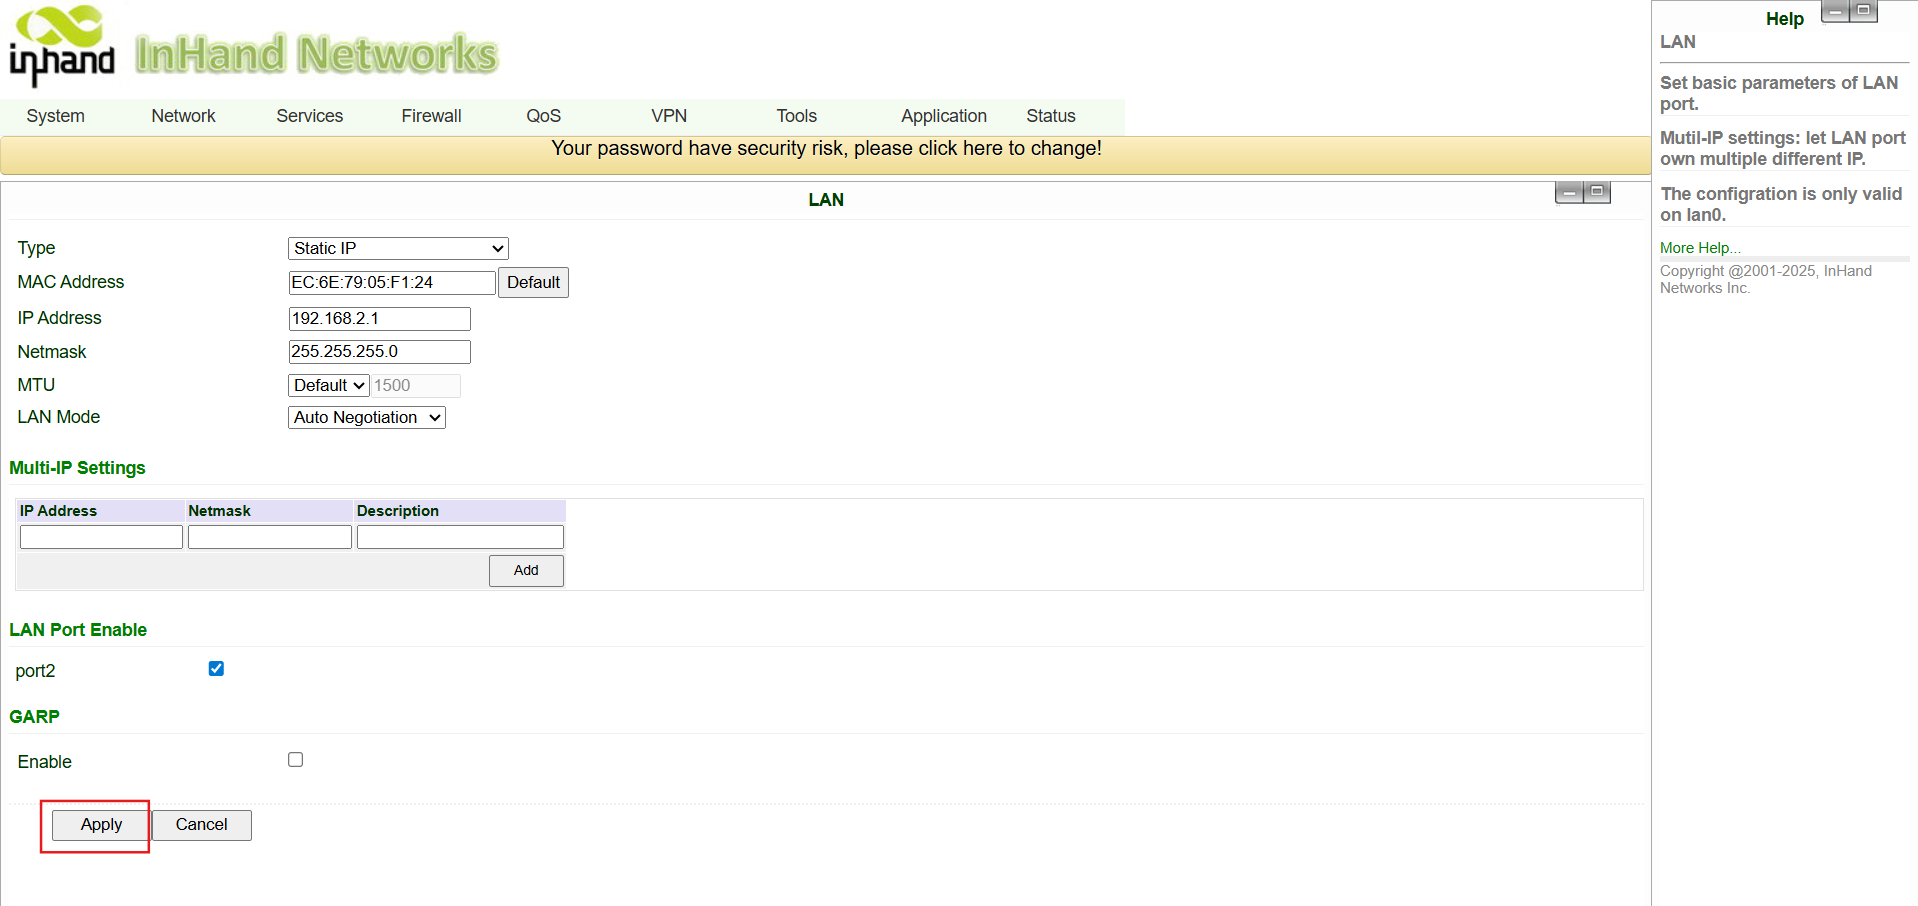
- Go to Network Settings → LAN.
- Set an IP address that shares a subnet with the downstream devices and acts as their gateway.
- Click Apply.
- After applying, log in again using the new LAN IP.
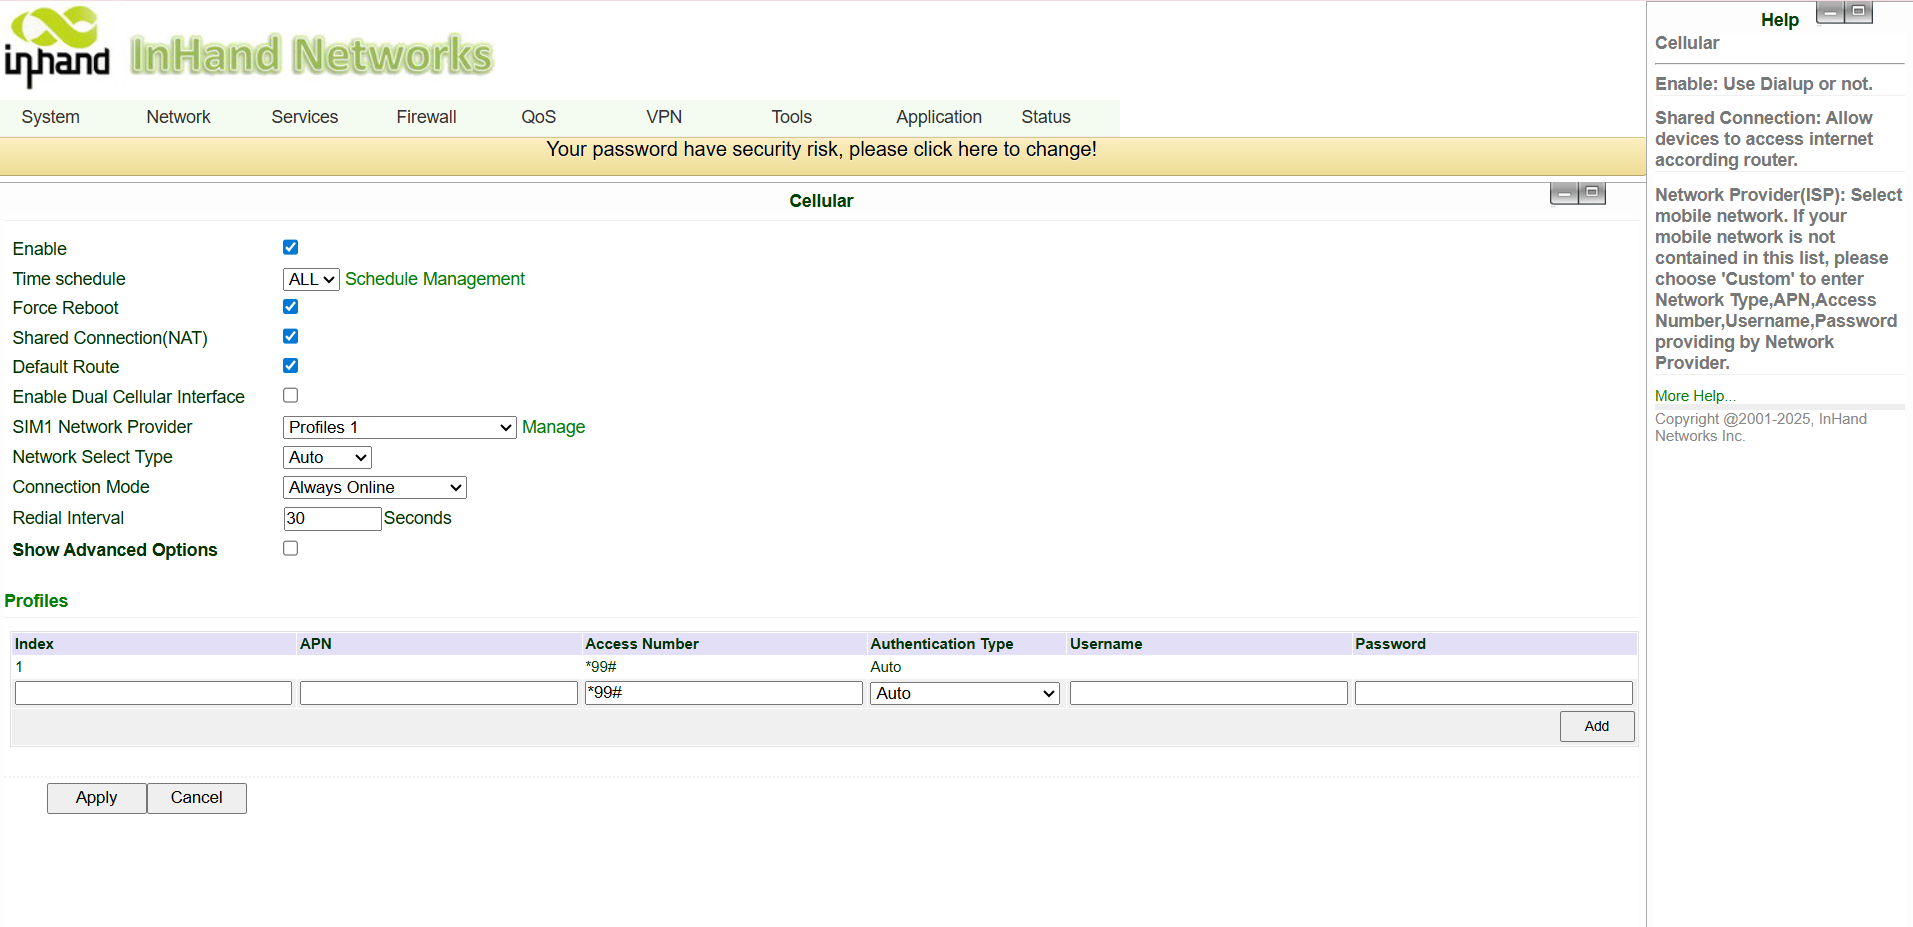
6.2 4G Cellular Configuration
- Power off the router and insert the SIM card.
- Go to Network → Cellular.
- For customized SIMs, configure the APN; a standard IoT SIM typically requires no APN.
- Check the Signal LED on the front panel — red: weak (0–10) / yellow: medium (11–20) / green: good (21–30).
7. Router User Management
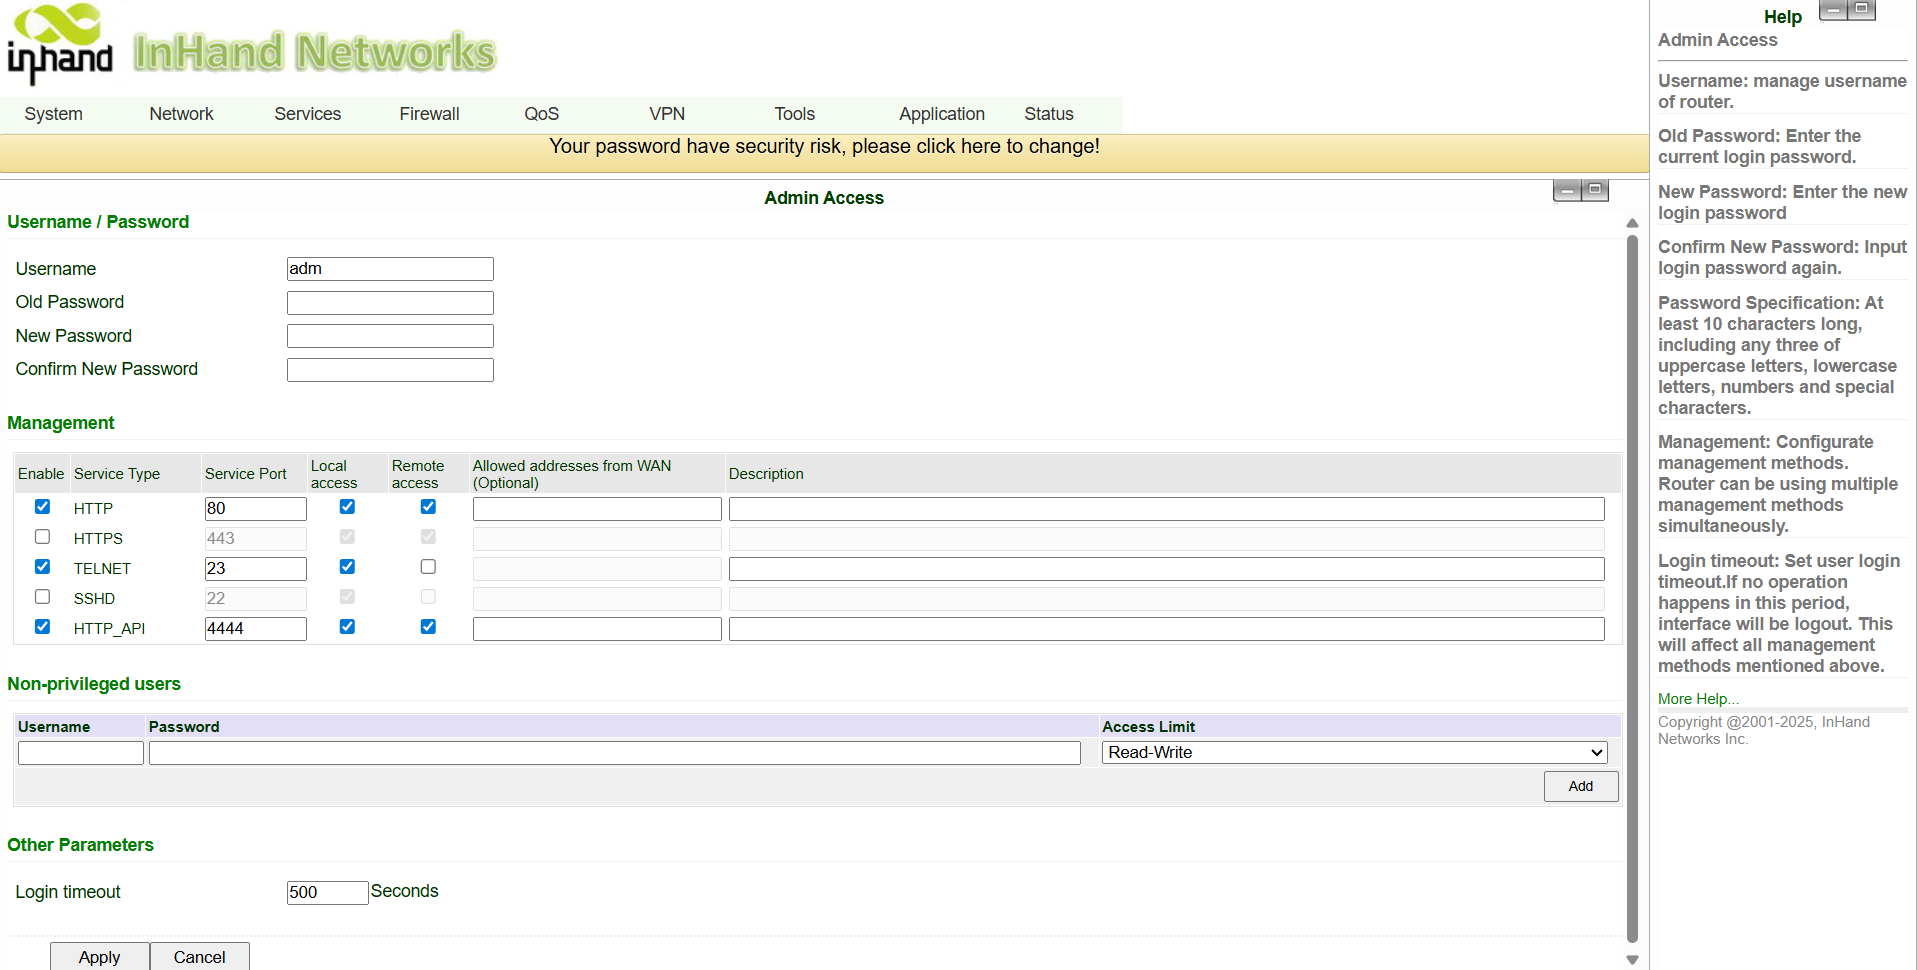
7.1 Change Username & Password (optional)
- Go to System Settings → Admin.
- Enter the username, old password, and new password.
- Click Apply and save the configuration.
7.2 Enable the Remote Management Platform (InConnect Service)
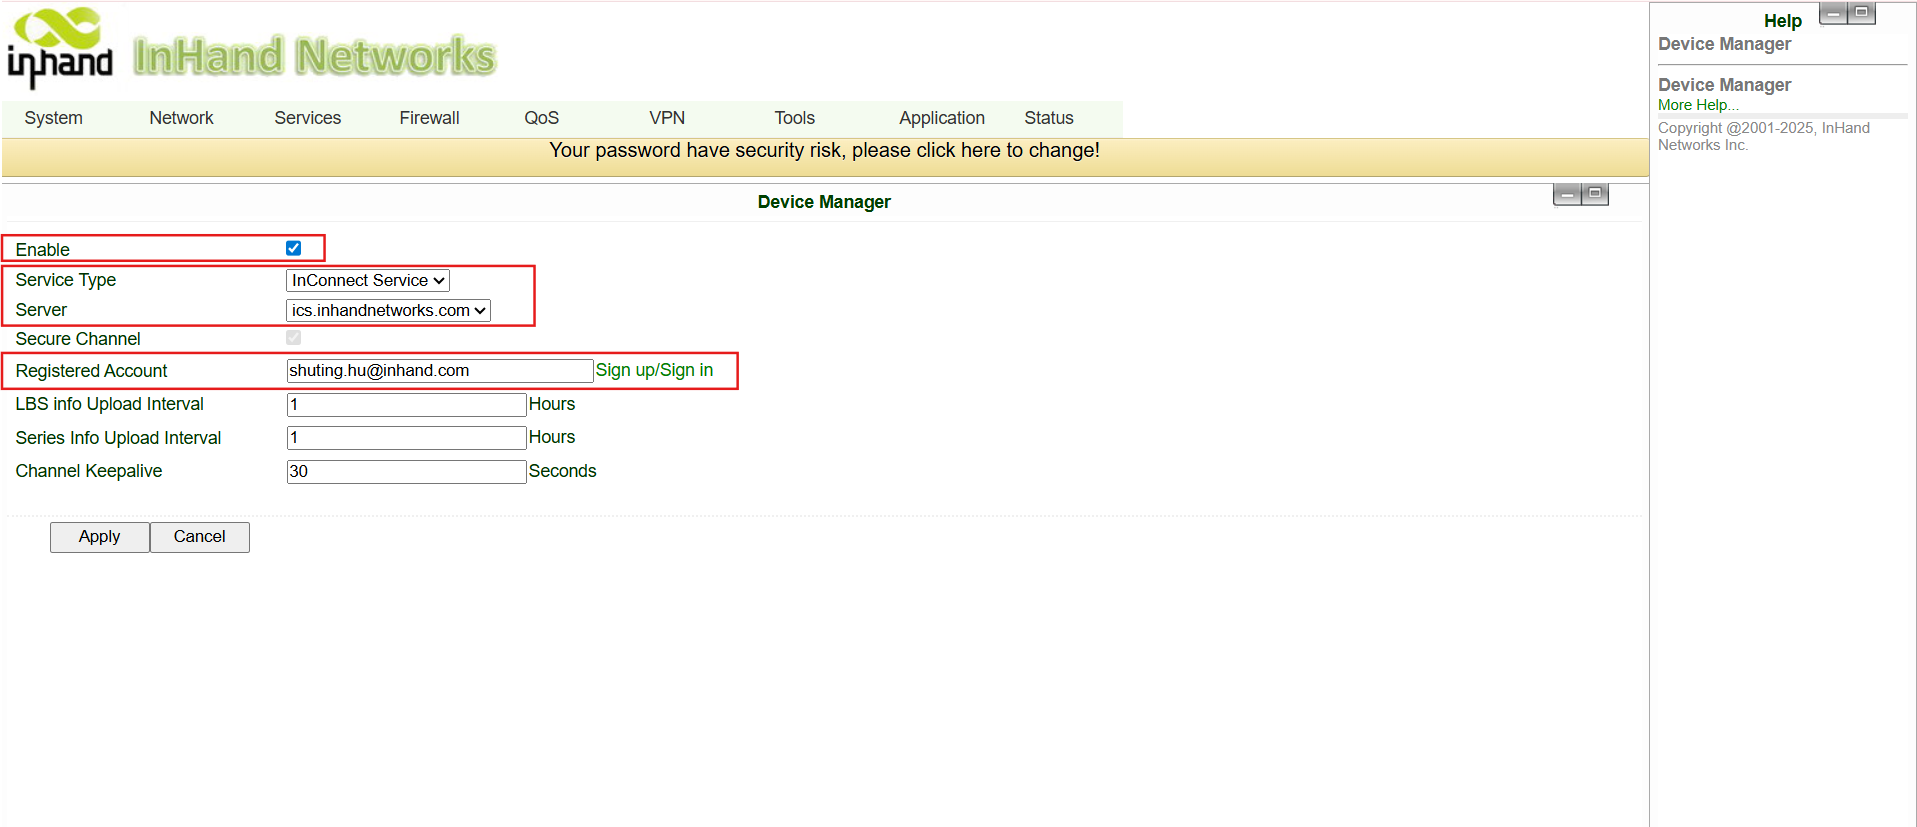
- Go to Services → Device Manager.
- Check Enable.
- Set Service Type to InConnect Service.
- Set Server to your regional endpoint (
ics.inhandnetworks.com). - Set Registered Account to the email you used when registering on ICS.
- Click Apply and save.
7.4 Configuration Backup & Restore (optional)
Backup configuration
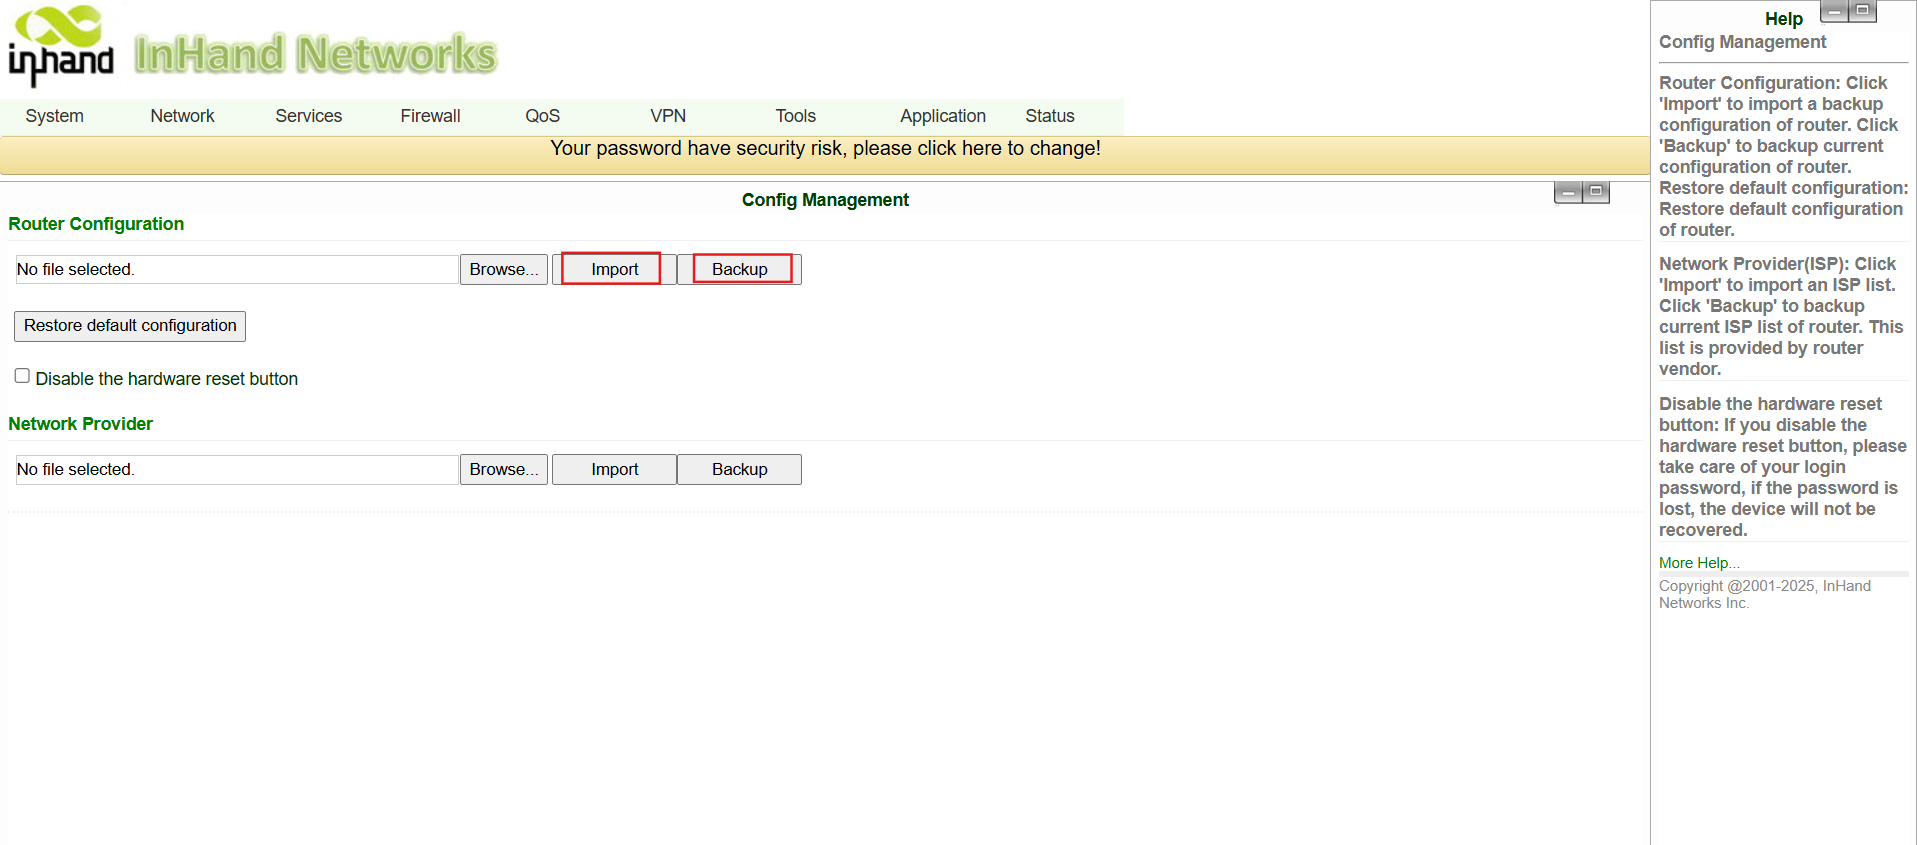
- Go to Services → Configuration Management.
- Under Router Configuration, click Backup.
Import configuration
- Go to Services → Configuration Management.
- Under Router Configuration, click Import.
- The imported configuration takes effect after reboot.
8. Adding the Router on InConnect Service
8.1 Add the Router
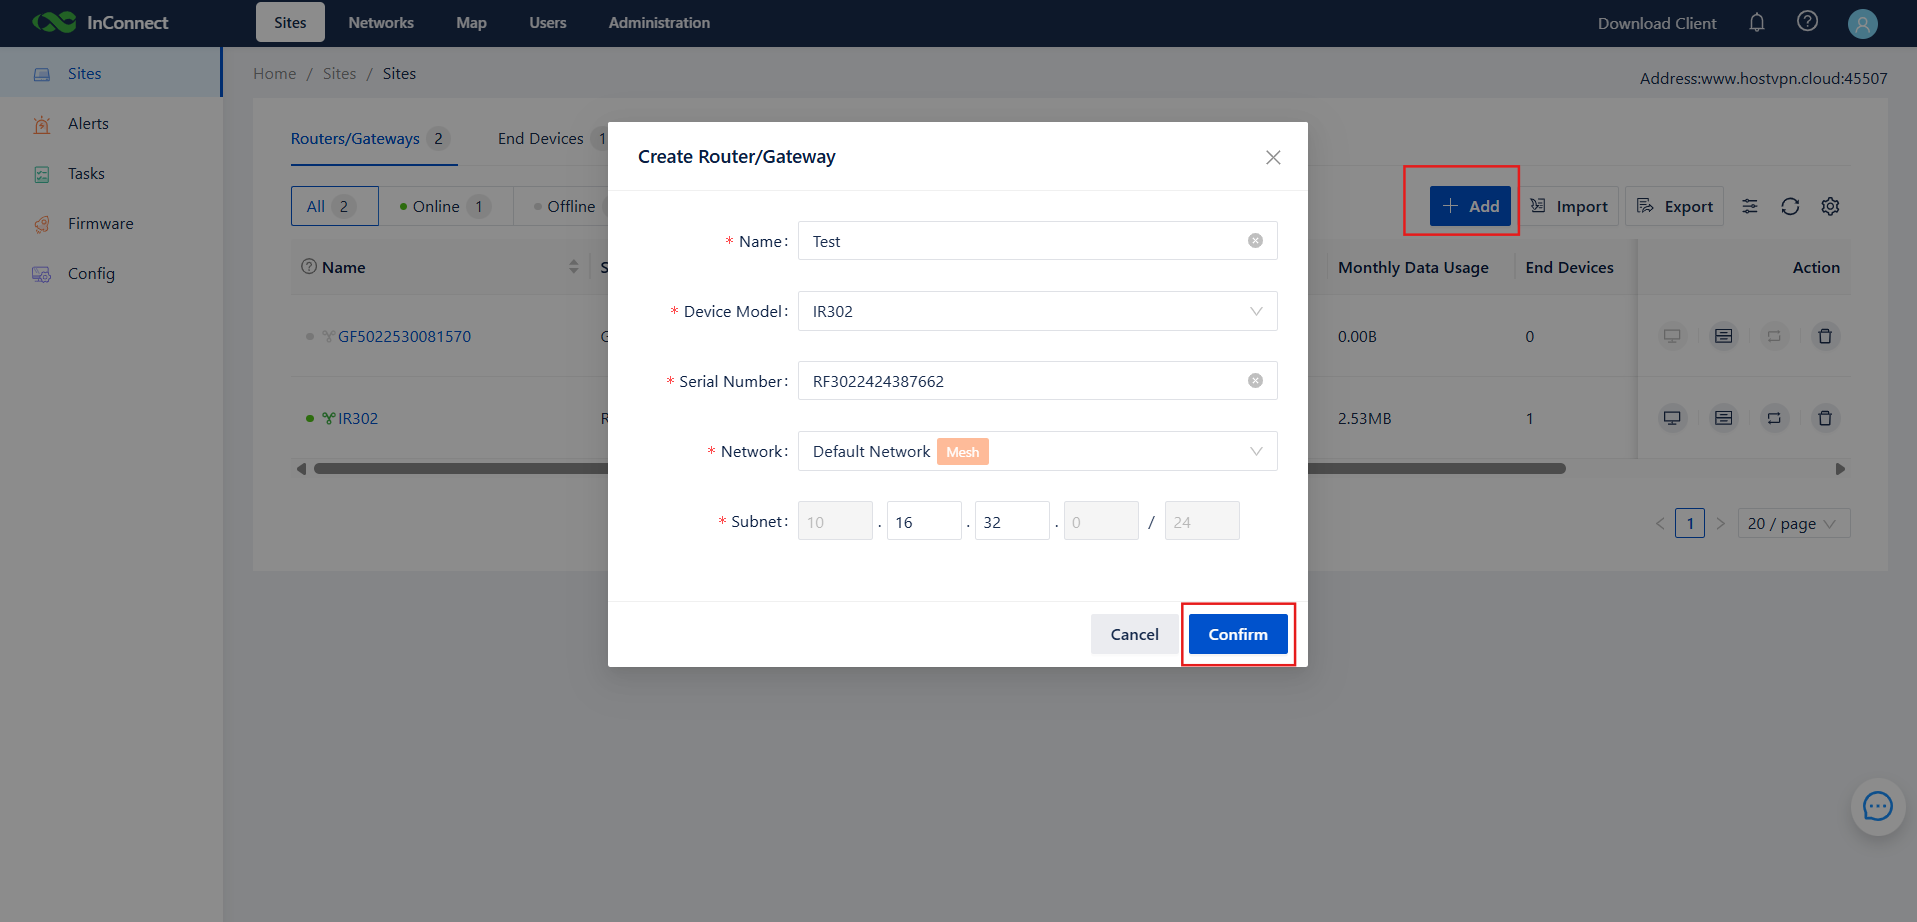
- Log in to ICS, go to Sites → Routers, and click Add.
- In the Create Router dialog, fill in:
- A custom name (e.g.,
Test) - The router's serial number (printed on the nameplate, also visible on the router's Web Status page)
- Router model: select IR302
- Click OK.
- After the router is added, ICS automatically allocates a virtual IP (10.16.x.x) to it.
The model must be correct; otherwise the connection will fail.
8.2 Verify the Connection
-
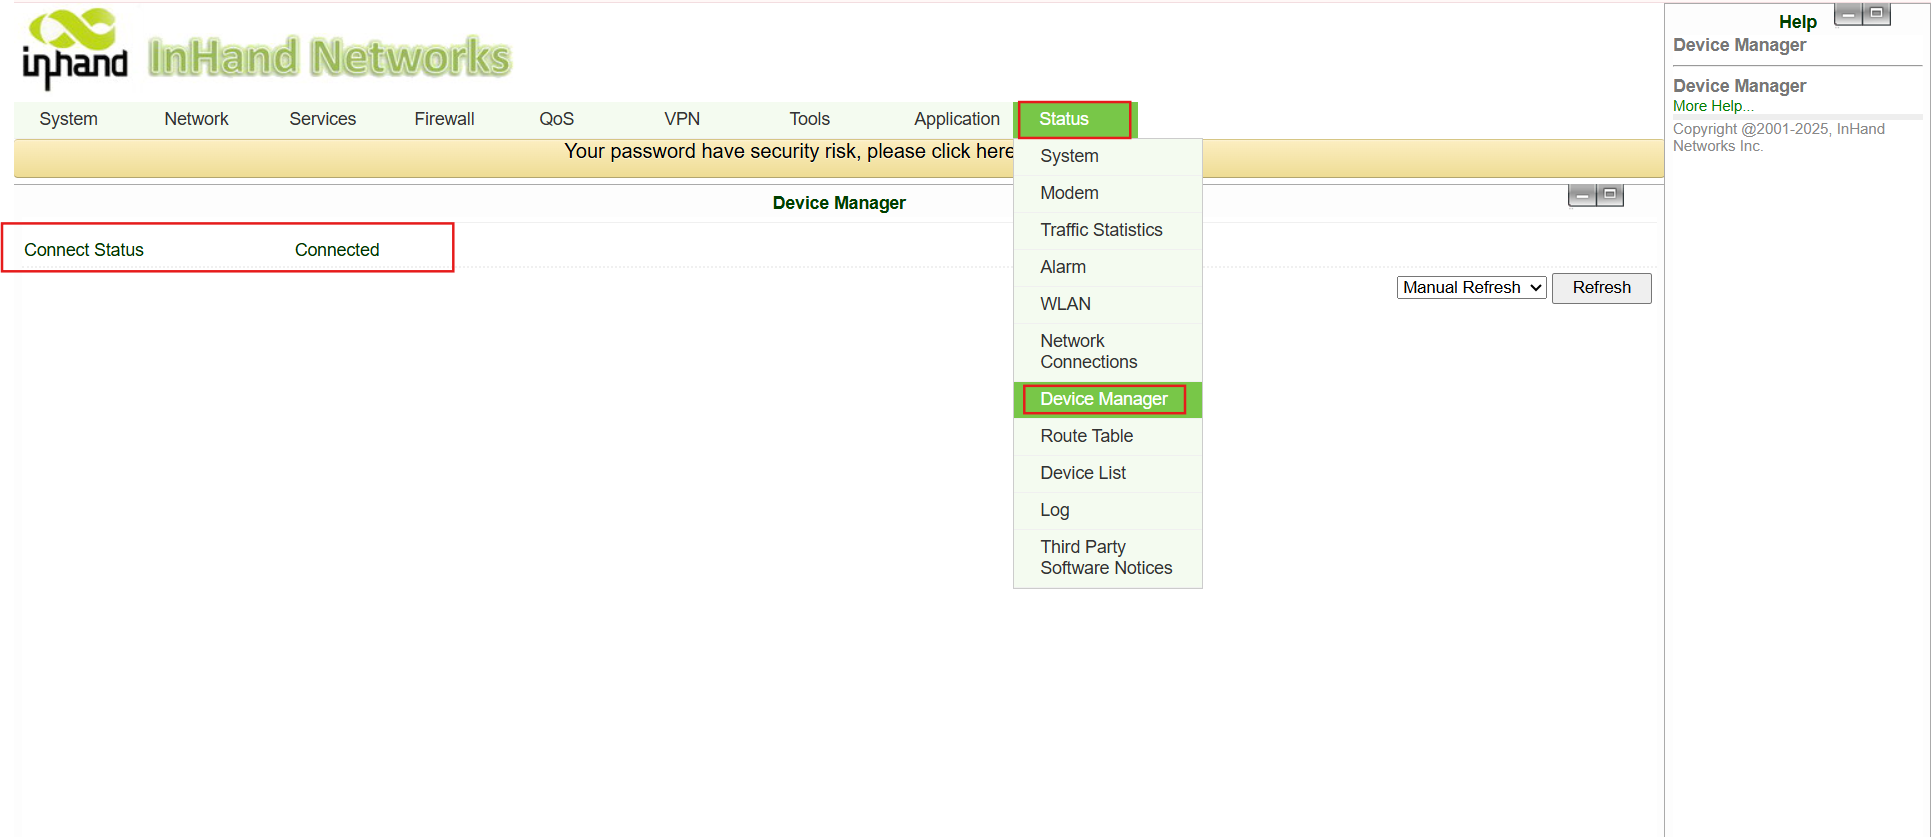
On the router Web UI, Services → Device Manager should show Connected.
-
On ICS:
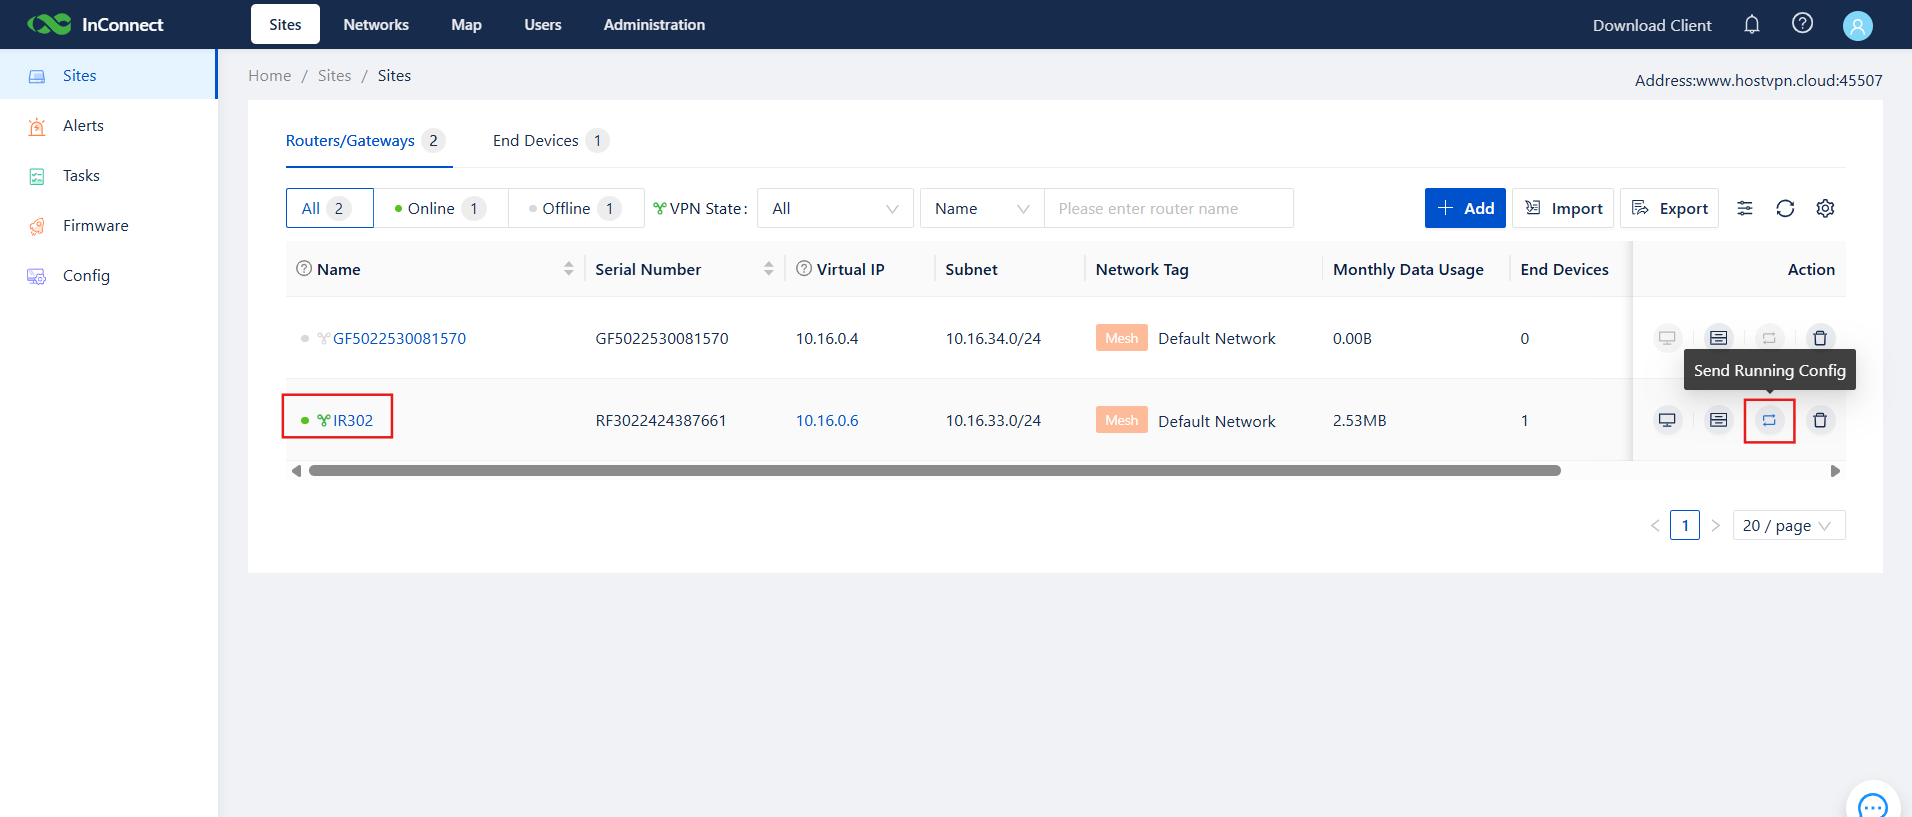
- Online status of the router is green → router is online.
- VPN status is green → the OpenVPN tunnel is established.
- If VPN remains offline, click Send running Config in the action column of the Routers / Gateways page.
9. Adding Downstream End Devices
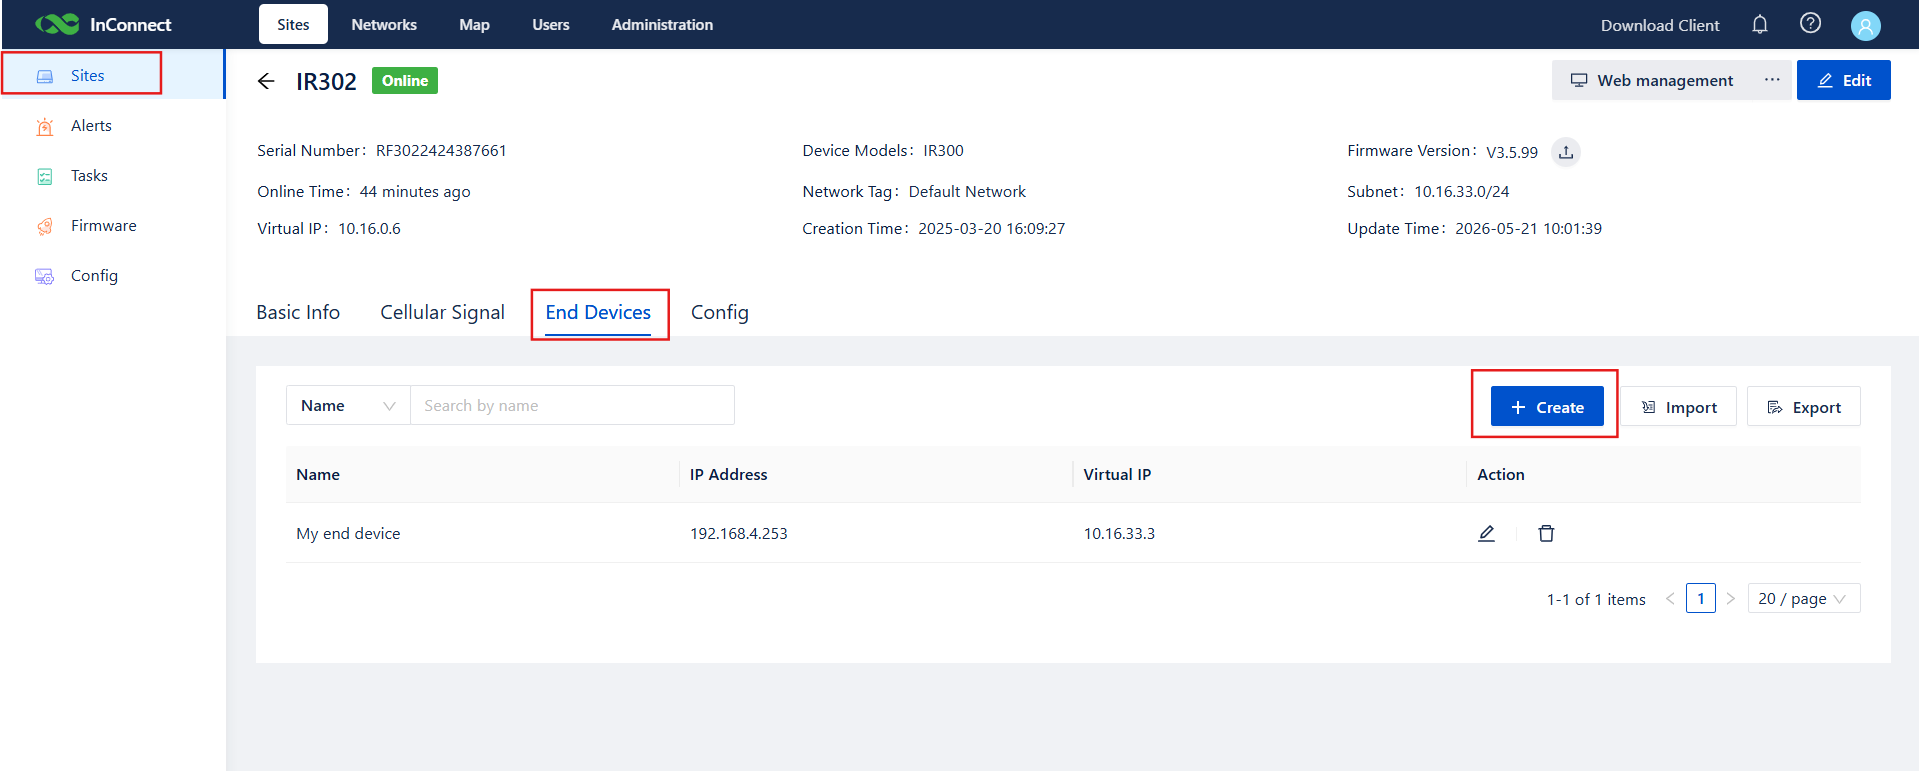
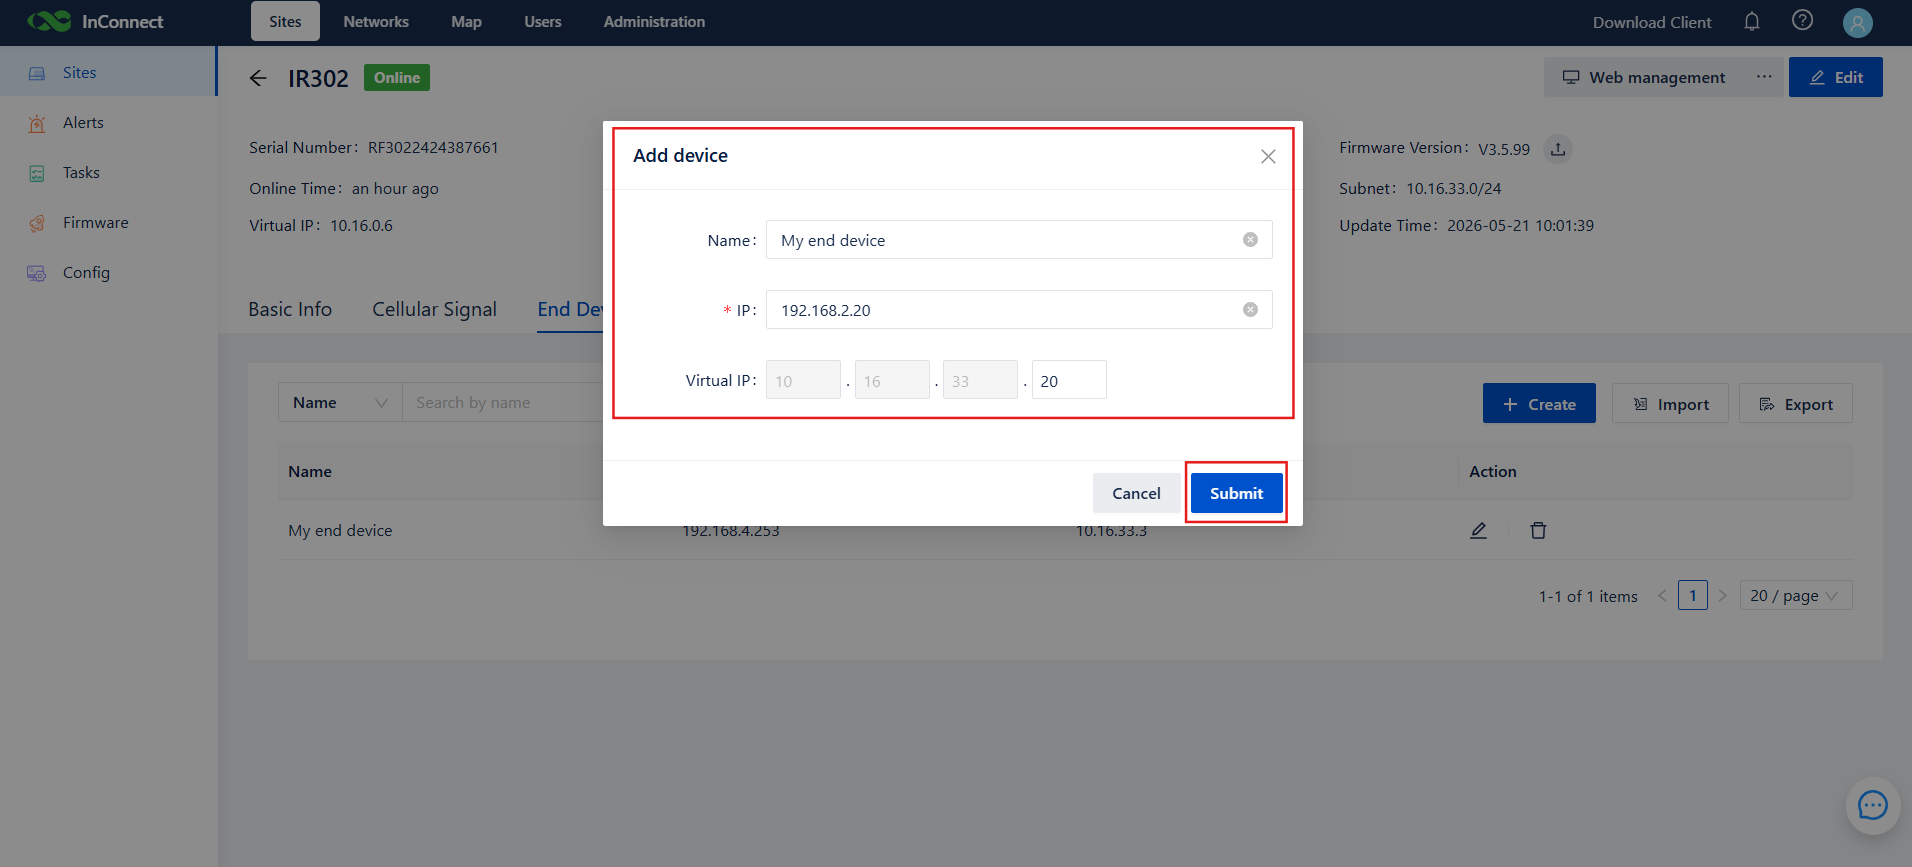
- On the ICS Sites page, choose End Devices → Add.
- Enter the device name and its real IP (e.g., PLC at
192.168.2.215). - Select the parent site (the IR302 you just added).
- Click Submit. ICS automatically maps the device to a virtual IP (e.g.,
10.16.46.1). - Up to 254 downstream devices are supported per IR302.
10. Remote Client Access (OpenVPN)
10.1 Windows
- Log in to ICS, download the OpenVPN client, and install it.
- In the Users list, download your
.ovpnprofile. - Run OpenVPN GUI as administrator. Right-click the tray icon → Import file, and import the profile.
- Click Connect. The tray icon turns green when the tunnel is up.
- Open a Command Prompt and ping the router's virtual IP (e.g.,
10.16.0.3). - If the ping succeeds, you are connected.
- If it fails, allow ICMP in Windows Defender Firewall or disable the firewall temporarily.
10.2 Android / iOS
- Scan the QR code in ICS to download the OpenVPN mobile client.
- Send the
.ovpnprofile to your phone. - In the client: FILE → select profile → IMPORT → ADD, then toggle on the profile.
- After the tunnel is up, use a ping app to verify the virtual IP is reachable.
11. Network Isolation (Optional)
11.1 Mesh Network — Device-to-Device Access
- Go to Networks → +, create a network and choose Mesh Network.
- Toggle on Device-to-Device Access.
- Add members (router sites + users) and click Submit.
Users and sites in the same Mesh can communicate; different Meshes are isolated, which is a clean way to avoid real-IP conflicts across multiple projects.
11.2 Star Network — Telecommuting
- Go to Networks → +, choose Star Network, fill in the center IP.
- Add users and sites, then submit.
Use Star Network when employees need to reach company intranet servers via the ICS channel.
12. Advanced Remote Management
- Remote Web — On ICS, click the router name to launch a remote Web session without any port forwarding.
- Remote configuration delivery — Push a previously backed-up router config to multiple IR302s in one batch.
- Remote firmware upgrade — Upload firmware to ICS, then trigger or schedule a batch upgrade.
- Tasks — Automate upgrades and configuration delivery; review execution status and logs.
- Consumption & billing — Per-device traffic and billing visibility.
13. Troubleshooting
- Cannot open the Web UI
- Check the subnet, cable, and IP conflicts.
-
Restore factory defaults and retry.
-
Cellular fails to dial up
- Verify the SIM card is healthy.
- Verify the APN is correct.
-
Confirm cellular coverage (Signal LED green, value 21–30 recommended).
-
Cellular works, but cannot reach the server
- Verify downstream devices have the correct IP and gateway.
- Verify DNS is configured.
-
If the SIM is a whitelist card, add
ics.inhandnetworks.com(or.eu) to the allowlist. -
IR302 shows "Registering" on ICS, never reaches "Connected"
- Confirm the serial number in ICS exactly matches the device.
- Confirm the router can resolve and reach the ICS server.
-
Confirm the Registered Account on the router matches the ICS login email.
-
Device online but VPN offline (green + grey)
- On ICS, click Send running Config in the Routers/Gateways action column.
-
Check whether the SIM provider blocks OpenVPN (UDP 1194).
-
OpenVPN client connects but virtual IP unreachable
- Disable Windows Defender Firewall or allow ICMP.
- Confirm both router status and VPN status are green on ICS.
-
Confirm the user and the site are members of the same Mesh network.
-
Downstream device unreachable via virtual IP
- Confirm the device's gateway points to the IR302 LAN IP.
- Some devices block ICMP — test the actual service port (Web / Telnet / Modbus) instead.
- Re-check the device's real IP in ICS.
14. Security Notes
- Ground the device properly in industrial environments.
- Do not hot-plug the serial port or SIM card while powered.
- Change the default IR302 password after first login and rotate it periodically.
- Enable 2FA or bind a mobile number on the ICS account; enforce a strong password policy.
- Use ICS External User to invite contractors; do not share the main account.
- Back up router configuration after every major change.
- Restrict on-site operations and remote-client usage to authorized personnel.