Always-Online Connectivity Configuration Guide
1. Document Information
- Product model: InHand IR302 Industrial Cellular Router
- Feature: Link Backup (WAN / Cellular / Wi-Fi automatic failover)
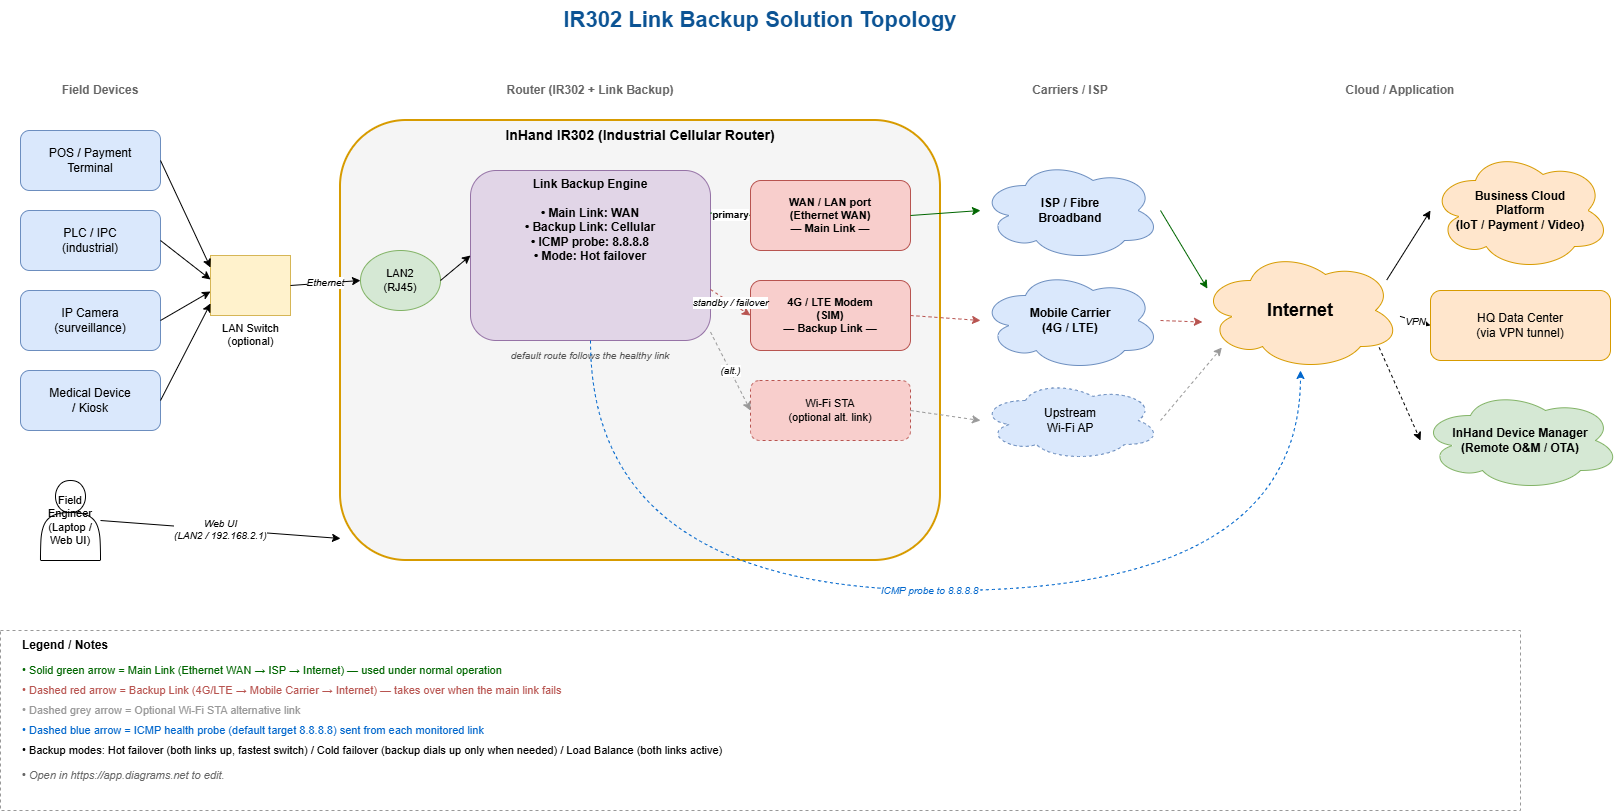
- Reference case: Ethernet WAN as Main Link, 4G cellular as Backup Link, ICMP probe to
8.8.8.8, Hot failover modeOverall flow: Bring up at least two uplinks on the IR302 (WAN + Cellular, or WAN + Wi-Fi, or Cellular + Wi-Fi). Then enable Link Backup, pick a Main Link and a Backup Link, set an ICMP detection target, and choose a Backup mode (Hot failover / Cold failover / Load Balance). The router automatically monitors and switches the default route based on the probe result.
2. Prerequisites
- IR302 powered on (DC 9–36 V) and reachable on its LAN port.
- A laptop connected to IR302 LAN2 and configured to the same subnet (default LAN
192.168.2.0/24). - SIM card inserted (insert with the device powered OFF) if cellular is used as one of the links.
- Ethernet uplink plugged into the
WAN/LANport (set as WAN) if Ethernet is used as one of the links. - Upstream Wi-Fi credentials (SSID + password) if Wi-Fi STA is used as one of the links.
- A web browser for the IR302 Web UI.
Default credentials (factory):
| Item | Value |
|---|---|
| LAN IP | 192.168.2.1 |
| Subnet mask | 255.255.255.0 |
| Web username | adm |
| Web password | 123456 (or random — see device label) |
Change all default passwords after first login.
3. Part 1 — Log in to the IR302 Web UI
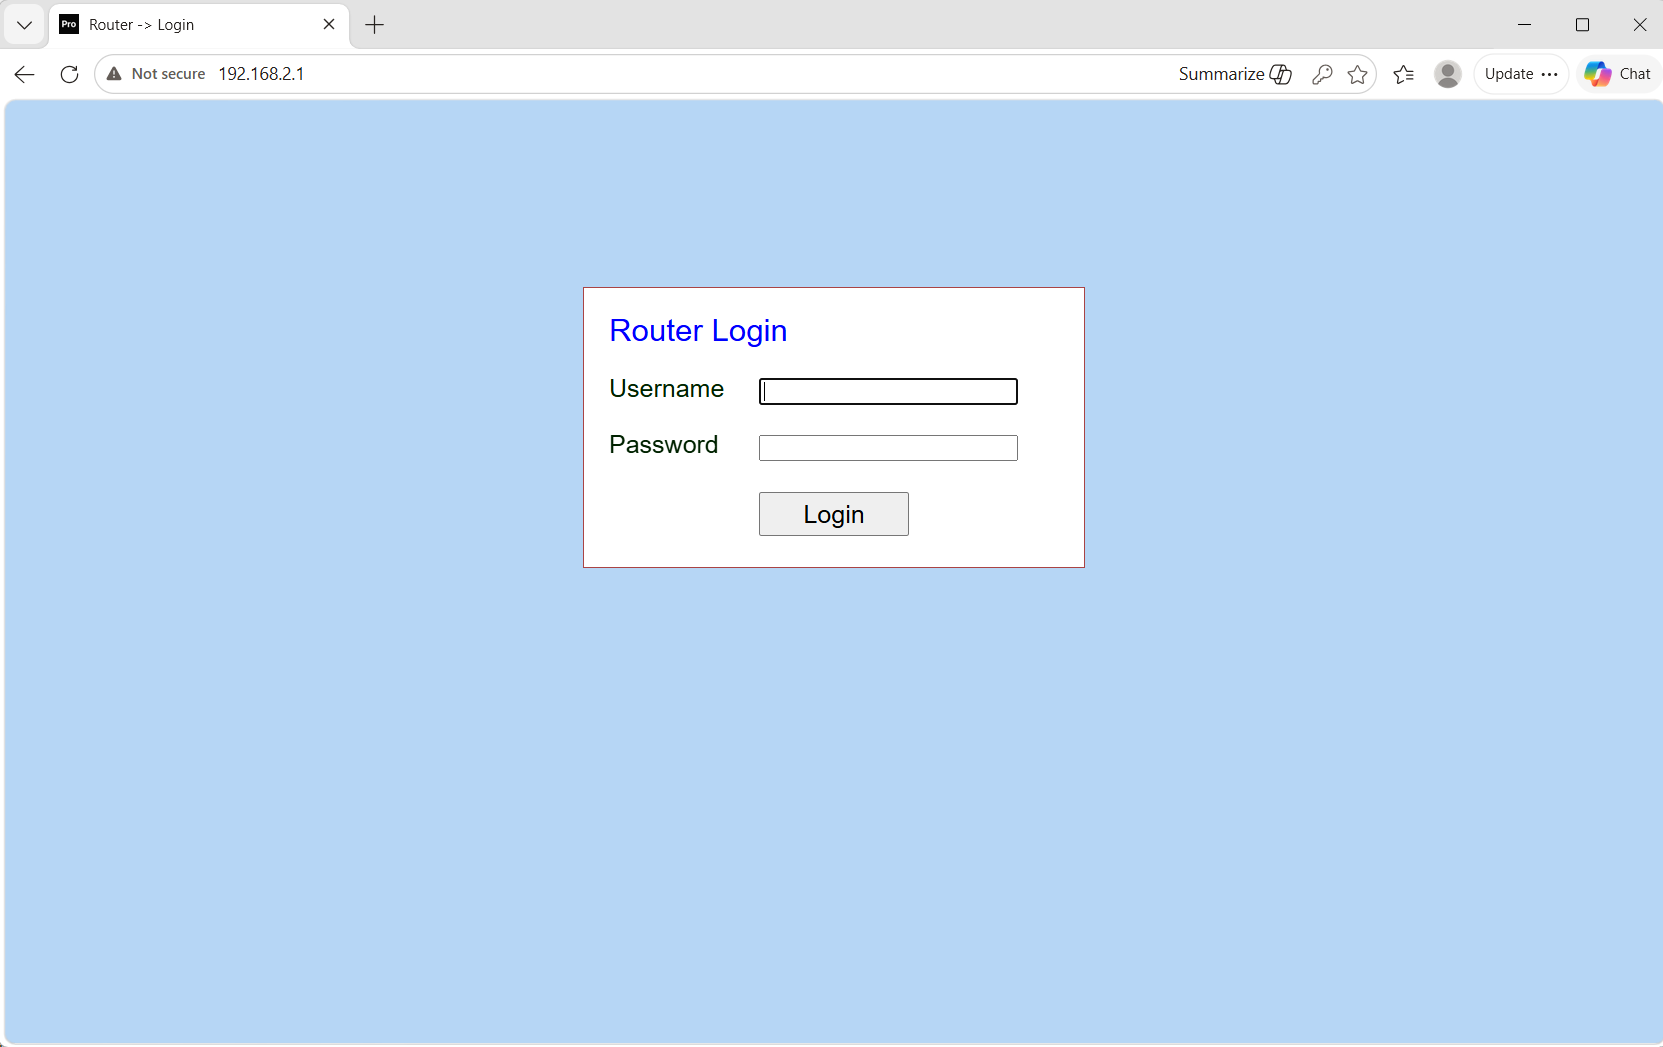
- Connect the PC to the IR302 LAN2 port with an Ethernet cable.
- Set the PC IP to the same subnet as
192.168.2.1(e.g.192.168.2.100/24). - Open a browser and go to
http://192.168.2.1. - Log in with the default credentials (
adm/123456) or the random password on the device label.
4. Part 2 — Bring up the Uplinks
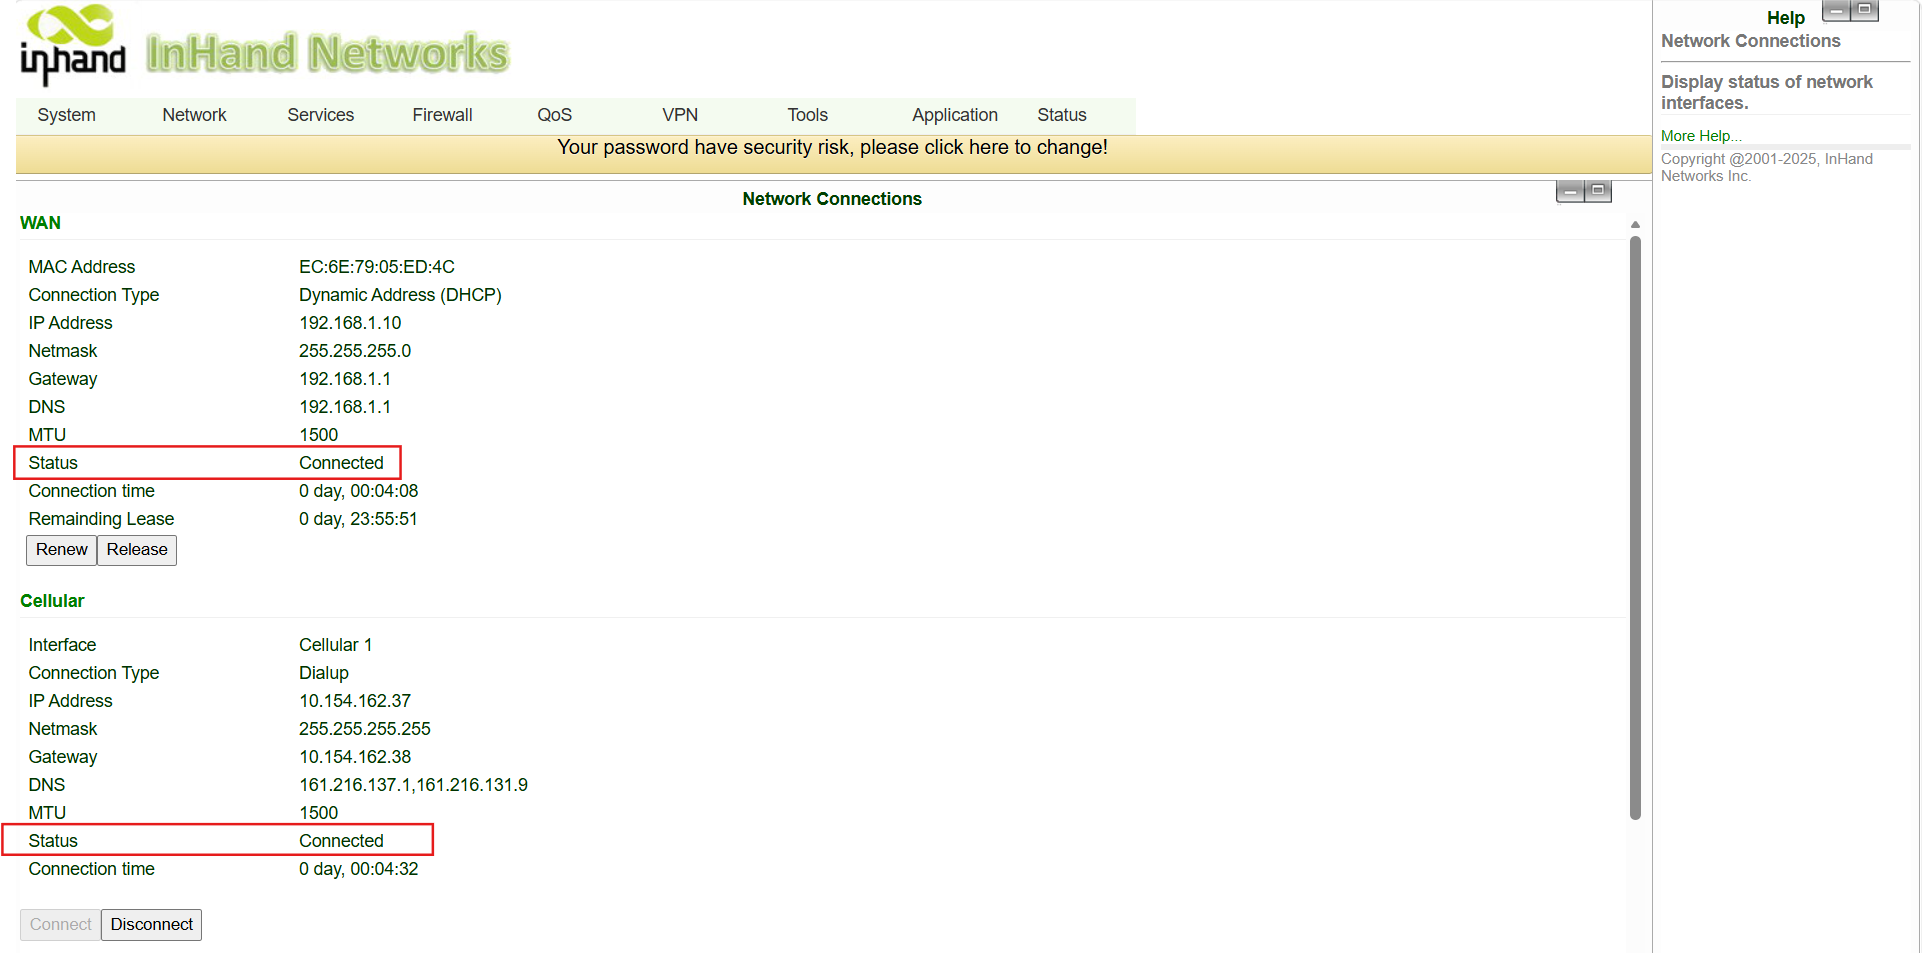
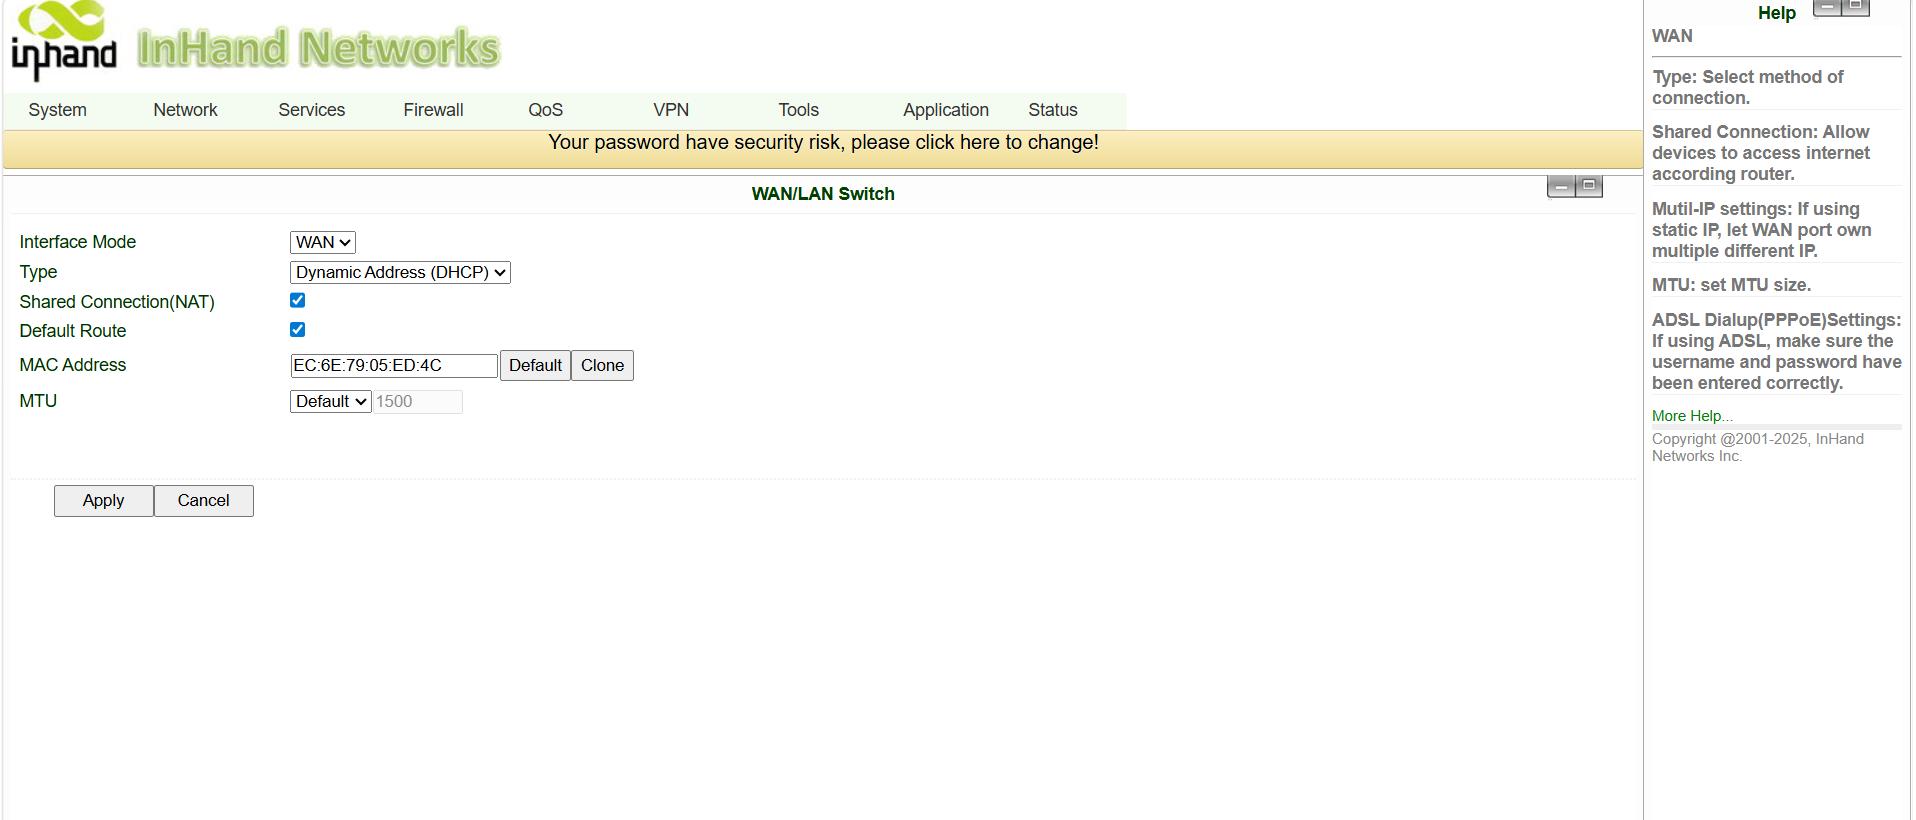
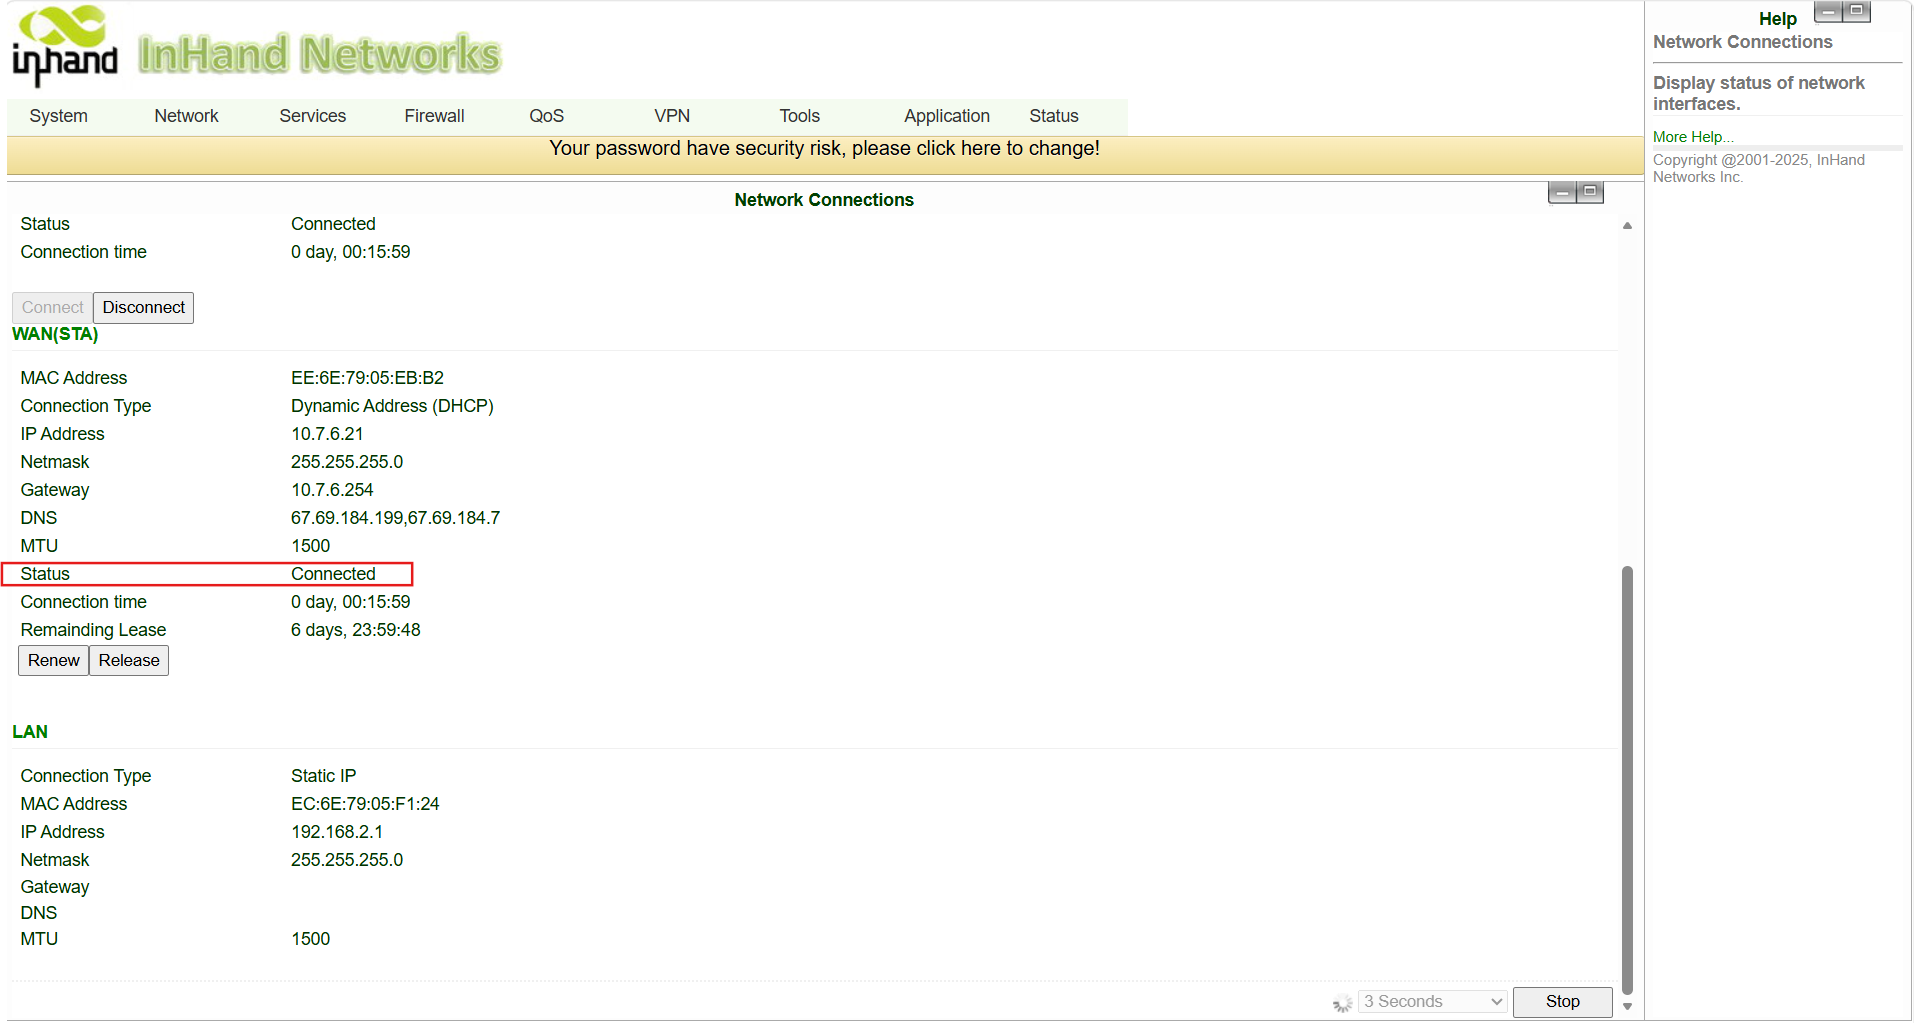
Before enabling Link Backup, both uplinks must already be configured and confirmed online individually. Go to Status → Network Connections and verify that each of the links you intend to use shows an active state.
4.1 Ethernet WAN
- Go to Network → WAN/LAN Switch).
- Set the
WAN/LANport to WAN mode. - Choose DHCP, Static, or PPPoE according to what the ISP provides; apply.
- Plug the ISP cable into the
WAN/LANport. - Confirm on Status → Network Connections that the WAN link has obtained an IP and is online.
4.2 4G Cellular
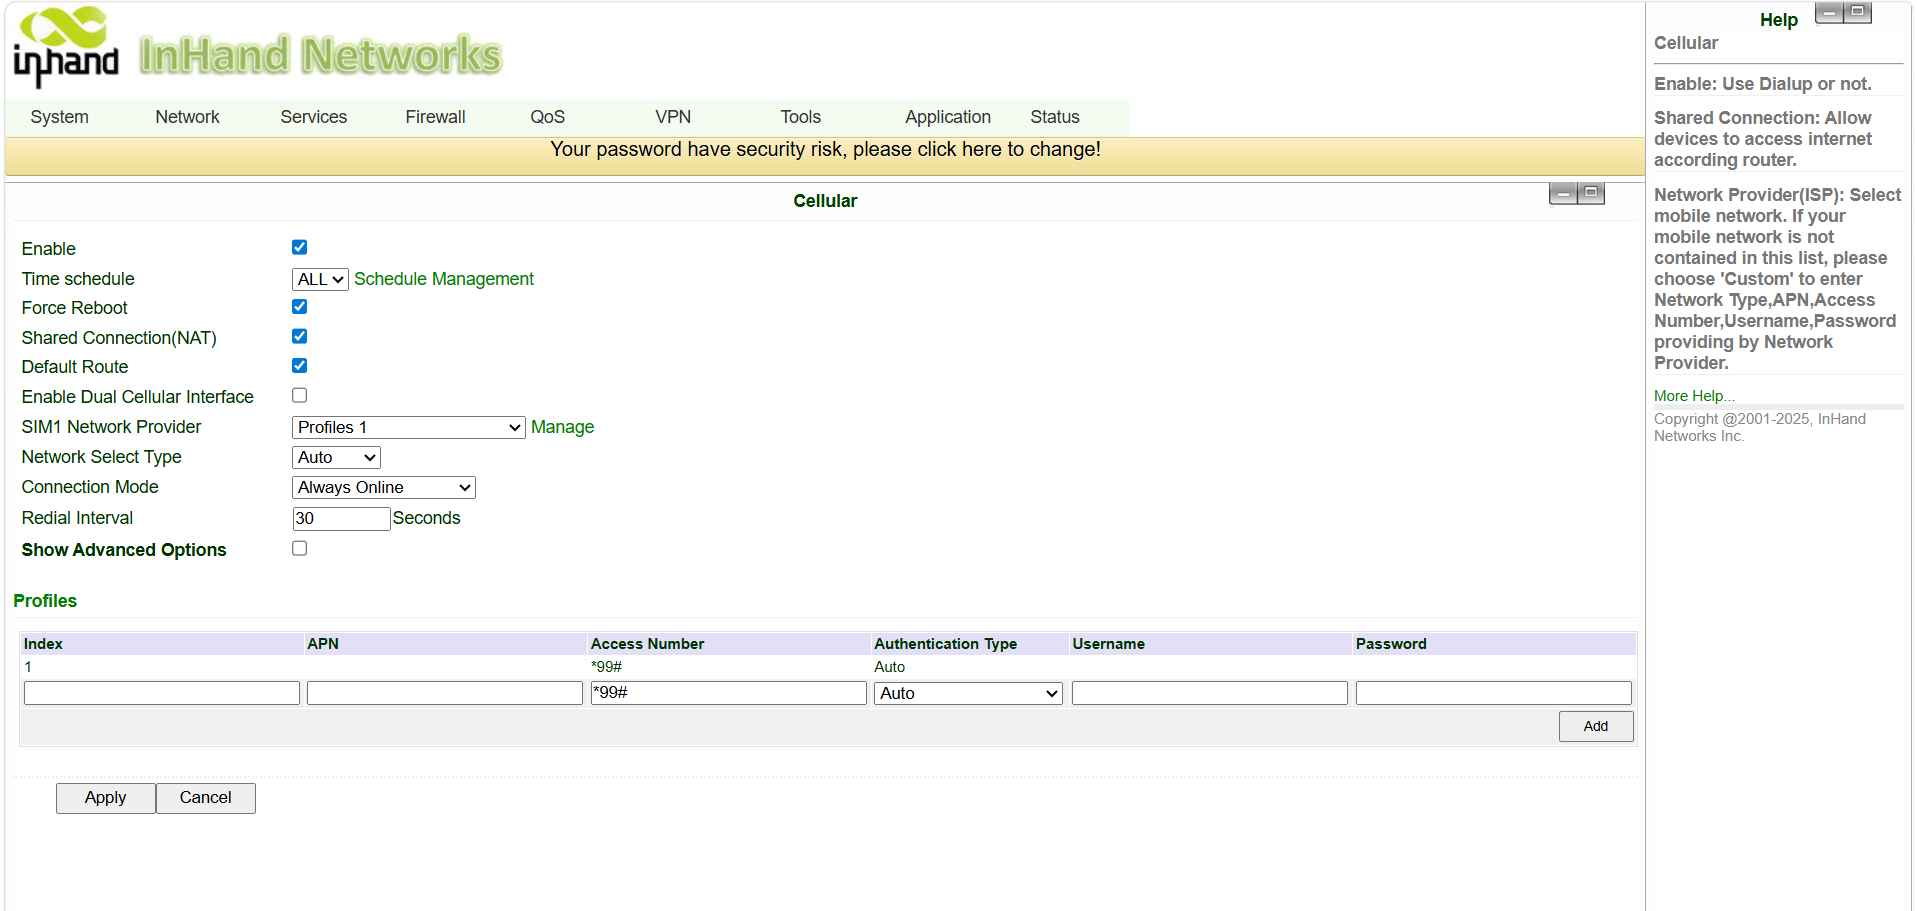
- Power the device OFF, insert the SIM card, power back ON.
- Go to Network → Cellular.
- For public IoT SIMs, no APN is required. For private / customized SIMs, fill in the APN, username, and password provided by the carrier.
- Apply and wait for the cellular link to come up.
- Check the Signal indicator on the front panel: red = poor (0–10), yellow = medium (11–20), green = good (21–30). Aim for green.
- Confirm on Status → Network Connections that cellular has obtained an IP.
4.3 Wi-Fi STA (optional)
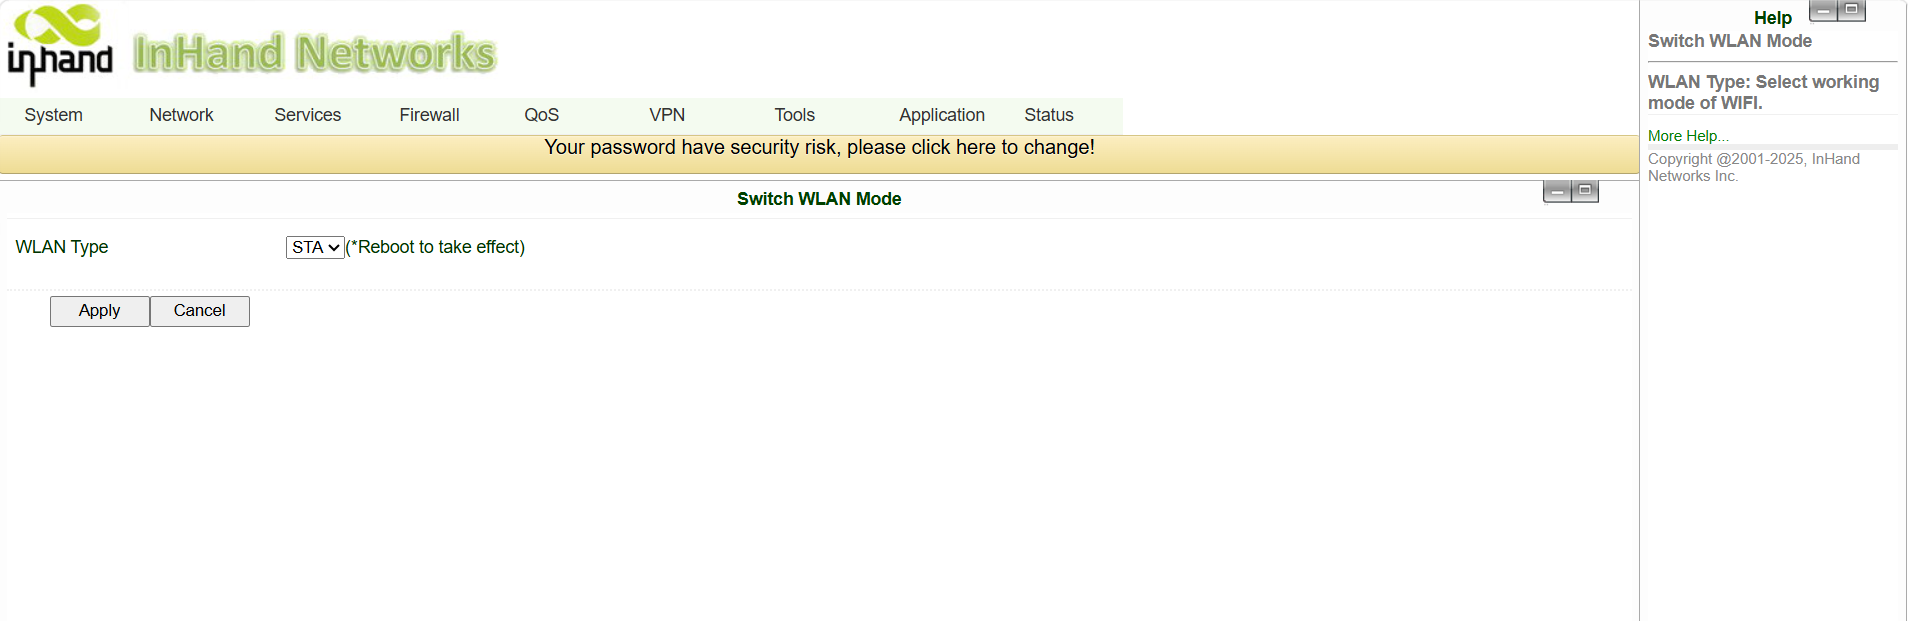
If Wi-Fi is to be used as one of the links, the IR302 Wi-Fi must be set to STA (client) mode, not AP.
- Go to Network -> Switch WLAN Mode, swith from AP -> STA, apply and reboot the device.
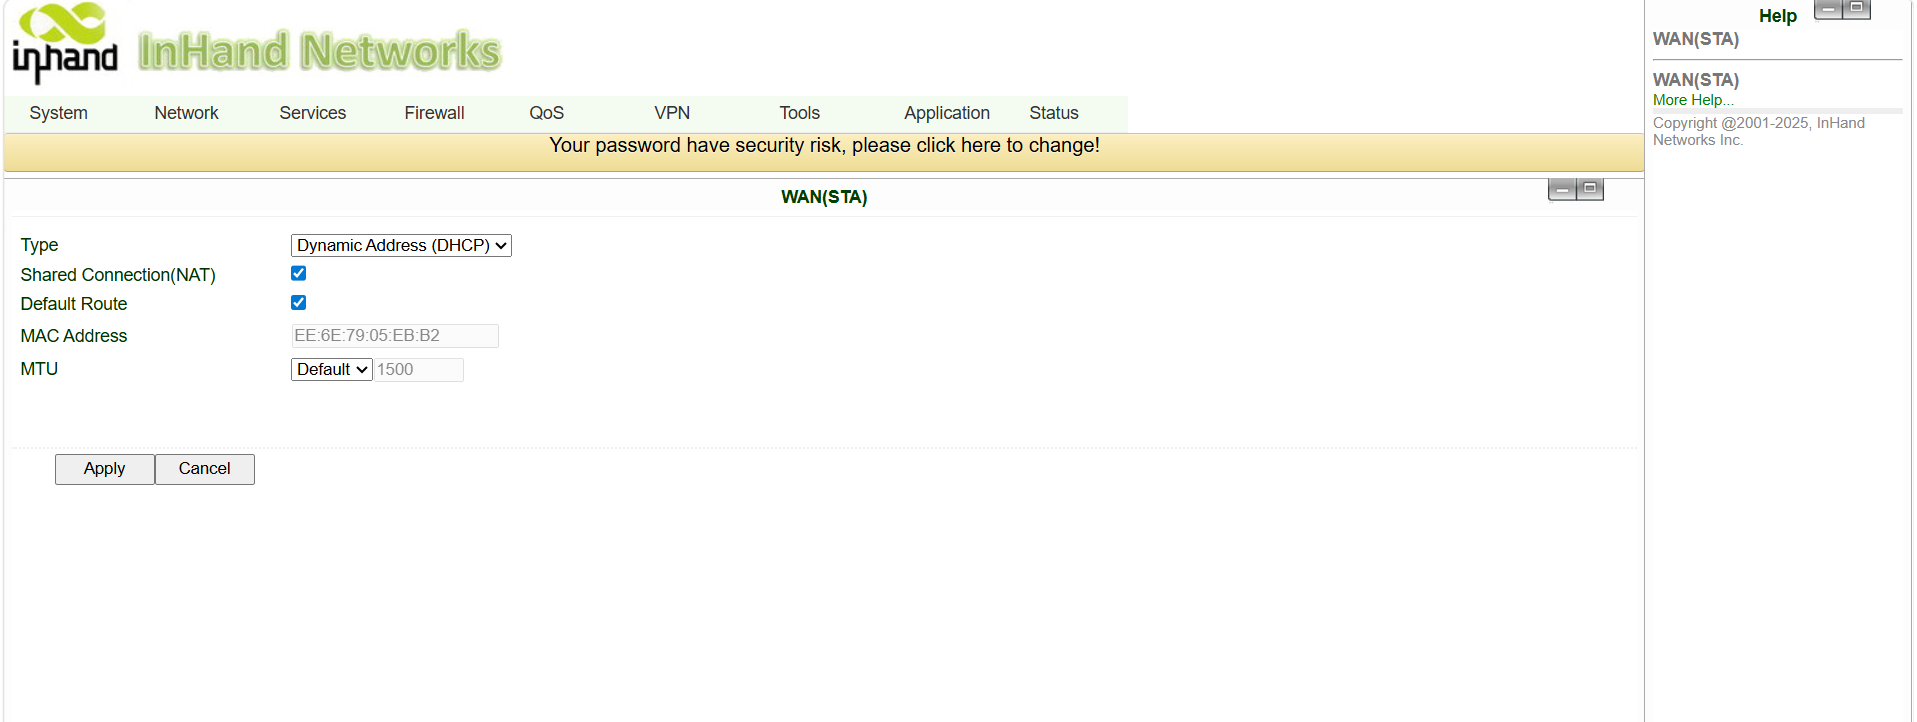
- Enable WAN(STA) mode,choose DHCP, Static, or PPPoE according to what the ISP provides; apply.
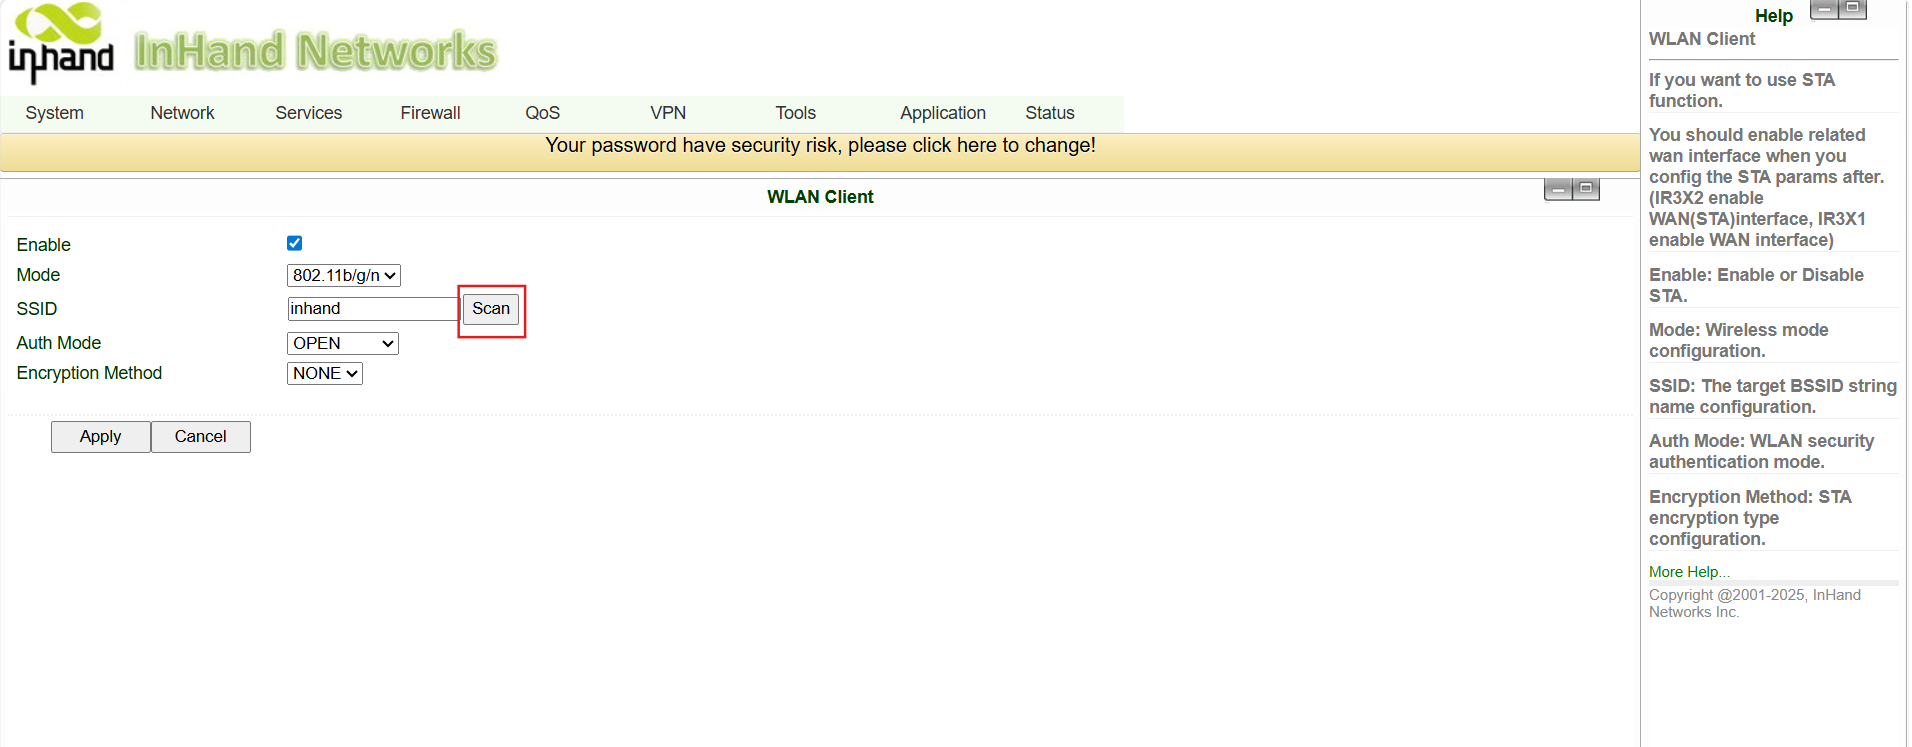
- Go to Network -> WLAN Client, scan for the upstream SSID, enter the Wi-Fi password, apply.
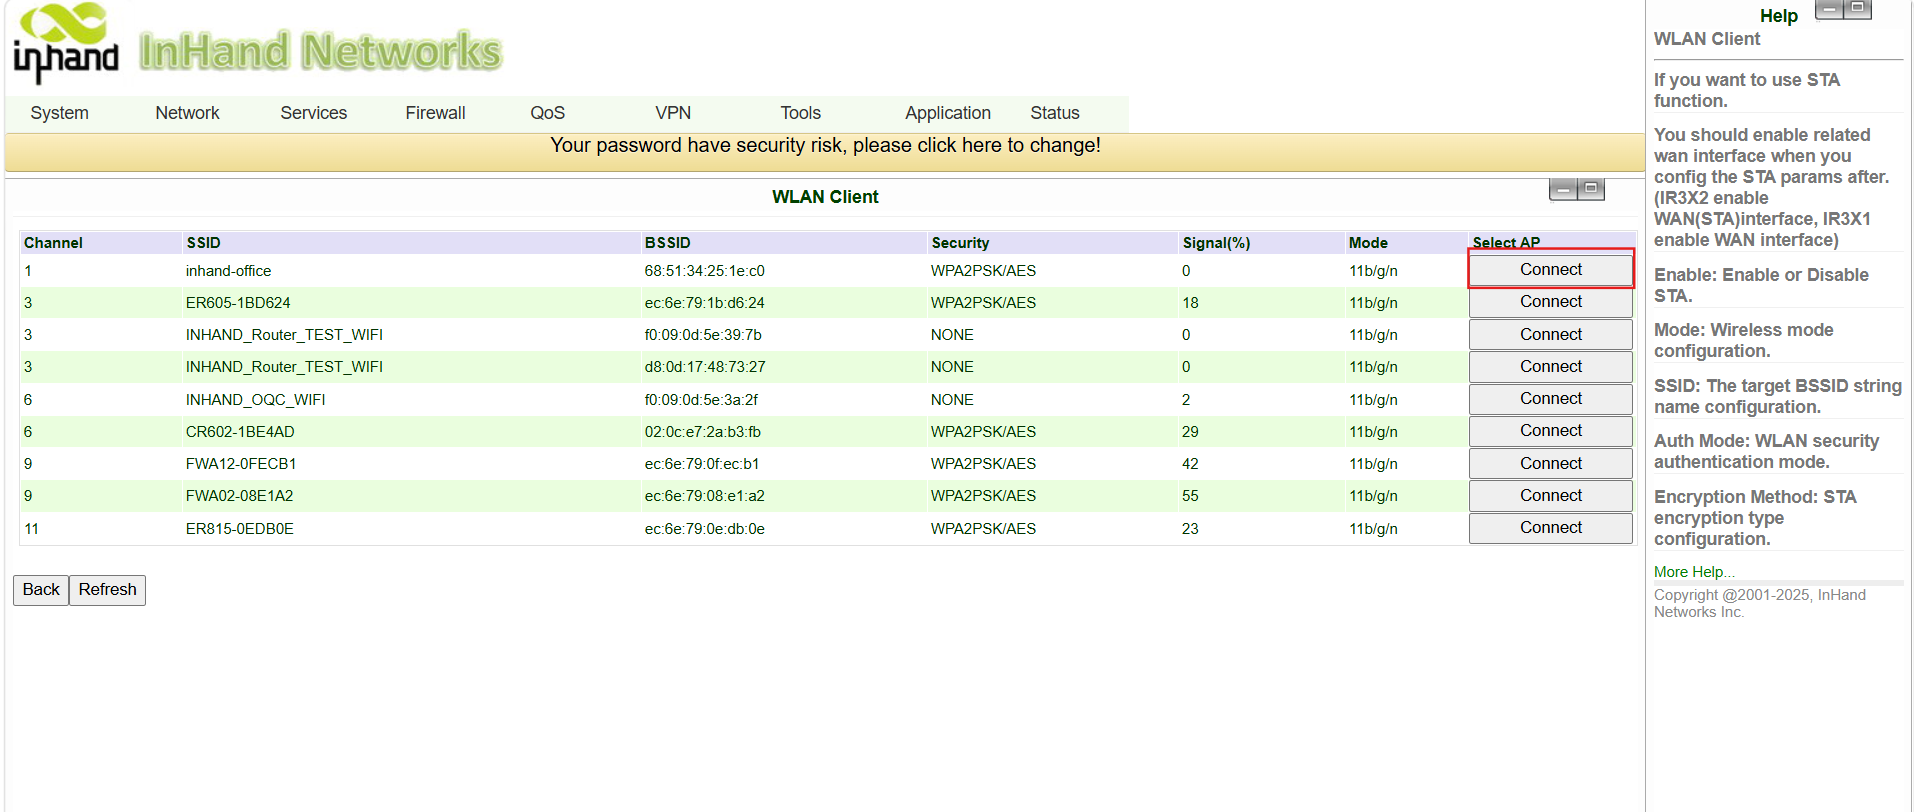
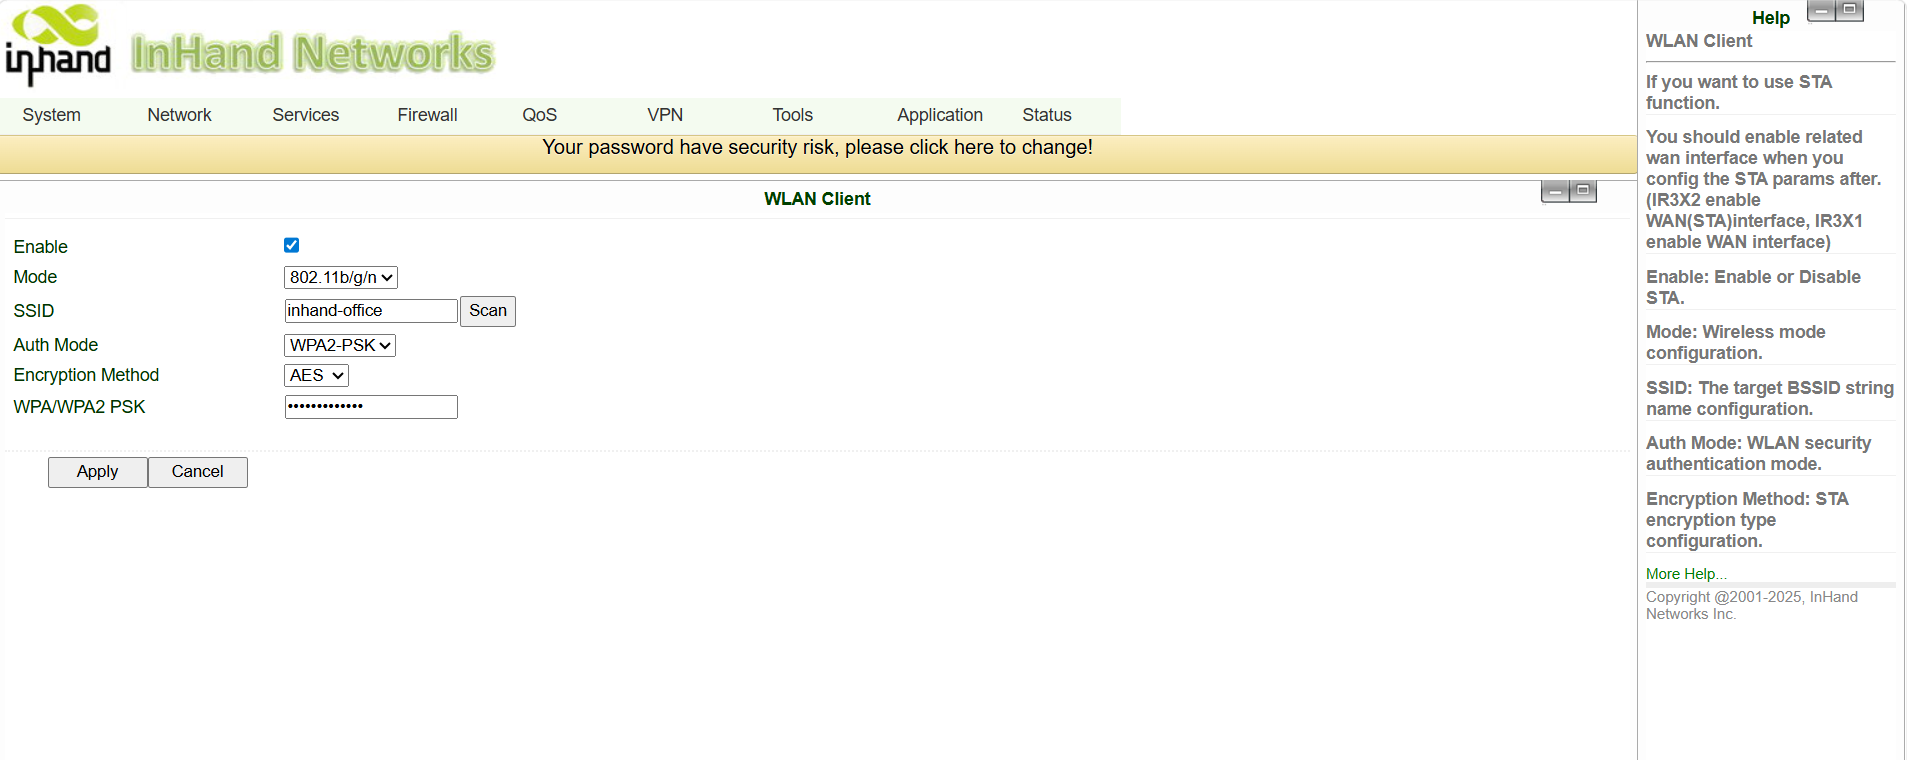
- Confirm on Status → Network Connections that Wi-Fi STA has obtained an IP from the upstream Wi-Fi.
5. Part 3 — Enable Link Backup
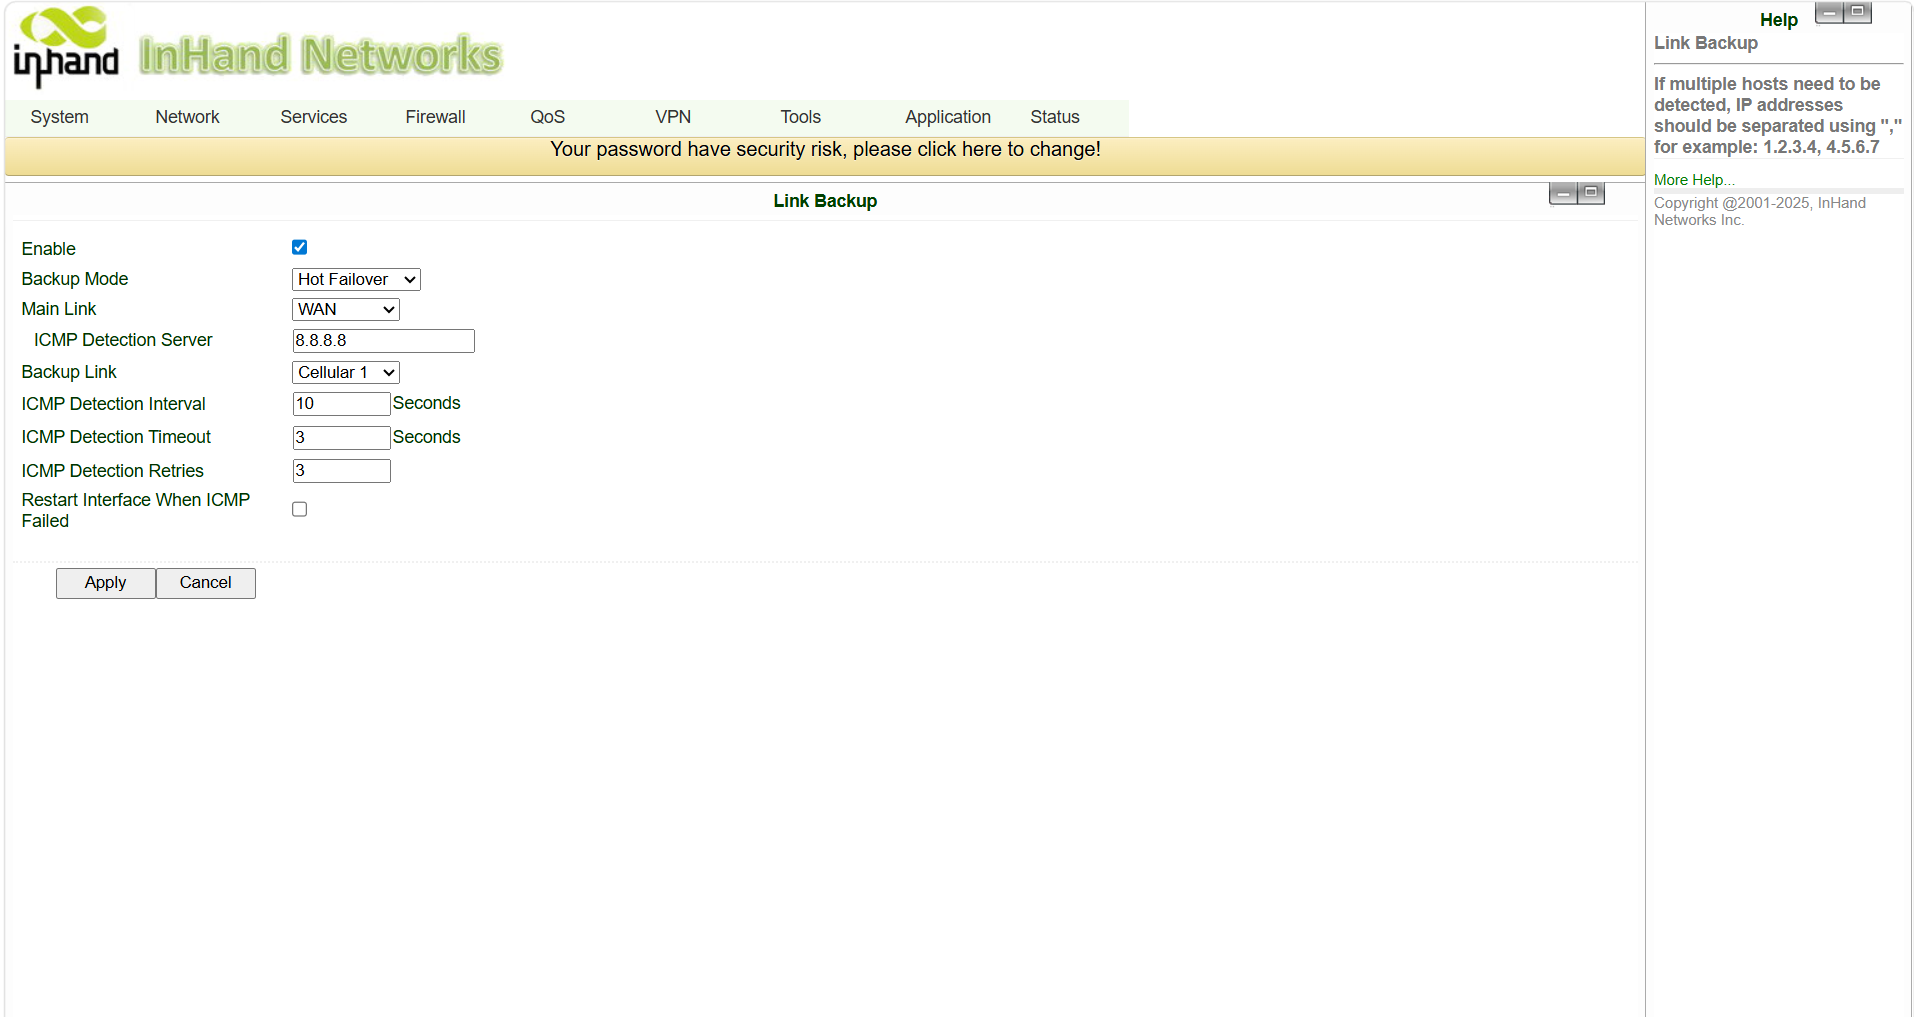
- Go to Network → Link Backup.
- Tick Enable.
- Select Main Link and Backup Link
- Click Apply.
5.1. Configure Main Link, Backup Link & Detection
Still on the Network → Link Backup page, fill in the parameters below.
| Field | Value (this case) | Notes |
|---|---|---|
| Main Link | WAN |
The preferred uplink under normal operation |
| Backup Link | Cellular |
Takes over when the main link fails |
| ICMP detection server | 8.8.8.8 |
Any always-on public IP; can be replaced with the customer's own HQ/server |
| Backup mode | Hot failover |
See section 6.1 below |
Click Apply to save.
5.2 Choosing the Backup mode
The IR302 supports three backup modes:
| Mode | Behavior | When to use |
|---|---|---|
| Hot failover | The router keeps both links connected at all times. If the main link fails, traffic switches to the already-online backup link immediately. Uses a small amount of data on the backup link to keep it alive. | Sites where the fastest failover is critical (payments, alarms, medical, mission-critical control). |
| Cold failover | Only the main link is up. The backup link only dials up when the main link is down. Zero cellular usage while the main link is healthy. Failover takes a few extra seconds because the backup needs to dial up. | Sites where minimizing SIM data charges is more important than the last few seconds of failover time. |
| Load Balance | The router uses both links at the same time and distributes outbound traffic across them. | Throughput aggregation, dual-SIM bonded use cases. |
For most fixed sites with wired WAN + 4G backup, Hot failover is the recommended default.
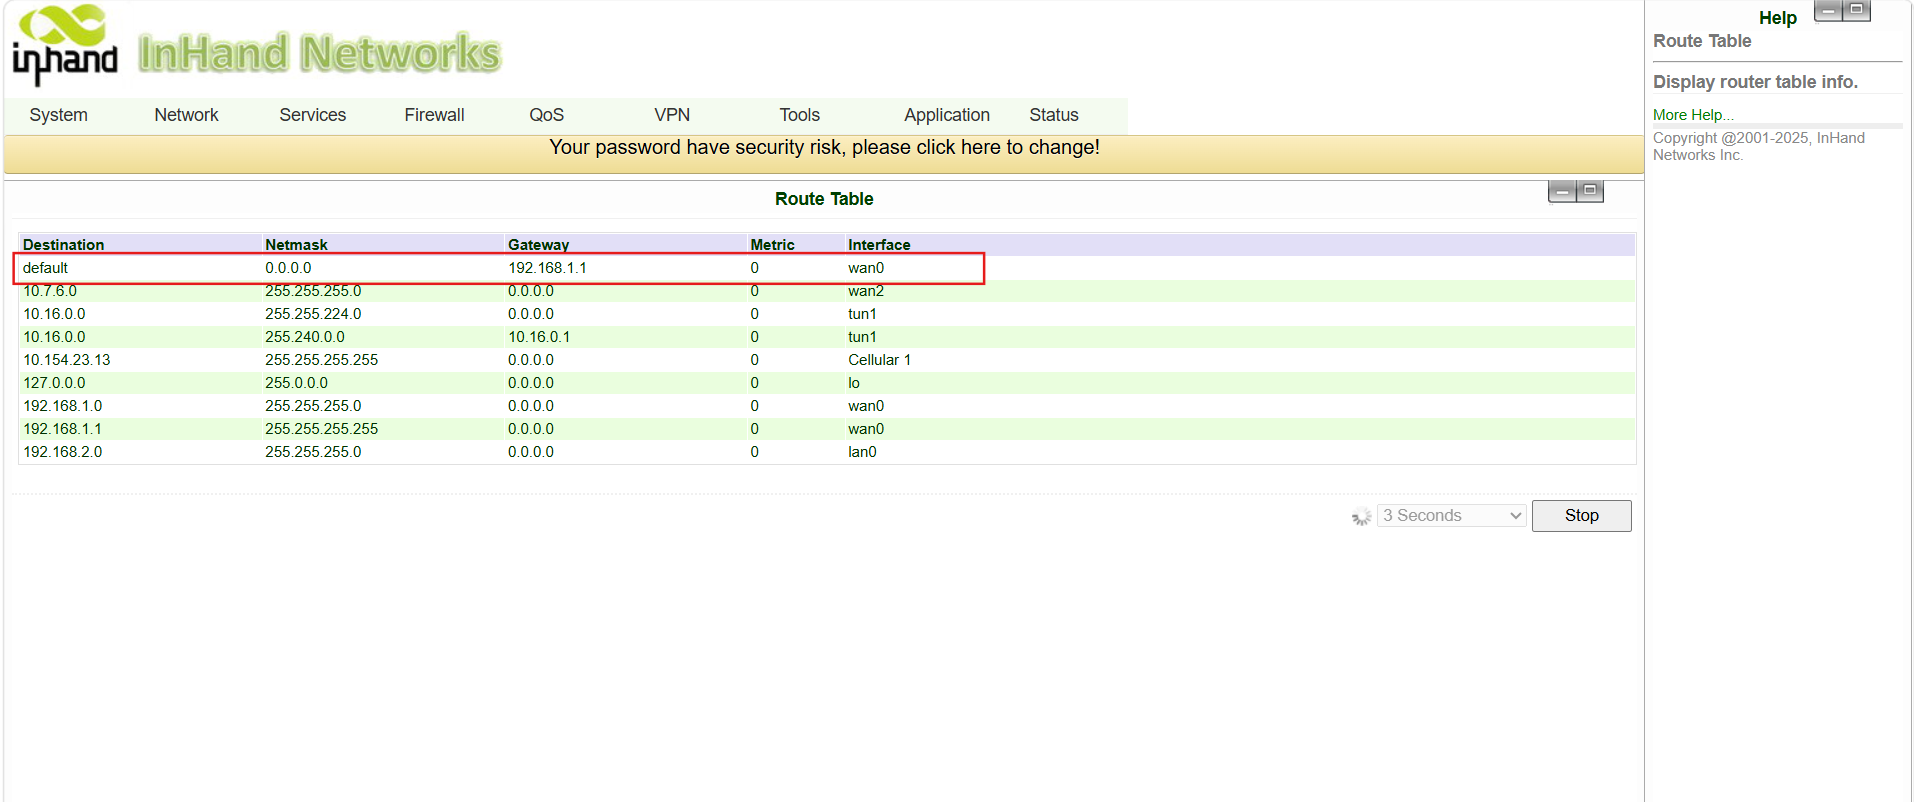
7. Part 5 — Verify the Default Route
- Go to Status → Route Table.
- The default route (
0.0.0.0/0) should point to the Main Link interface (in this case, the WAN interface).
8. Part 6 — Test Failover
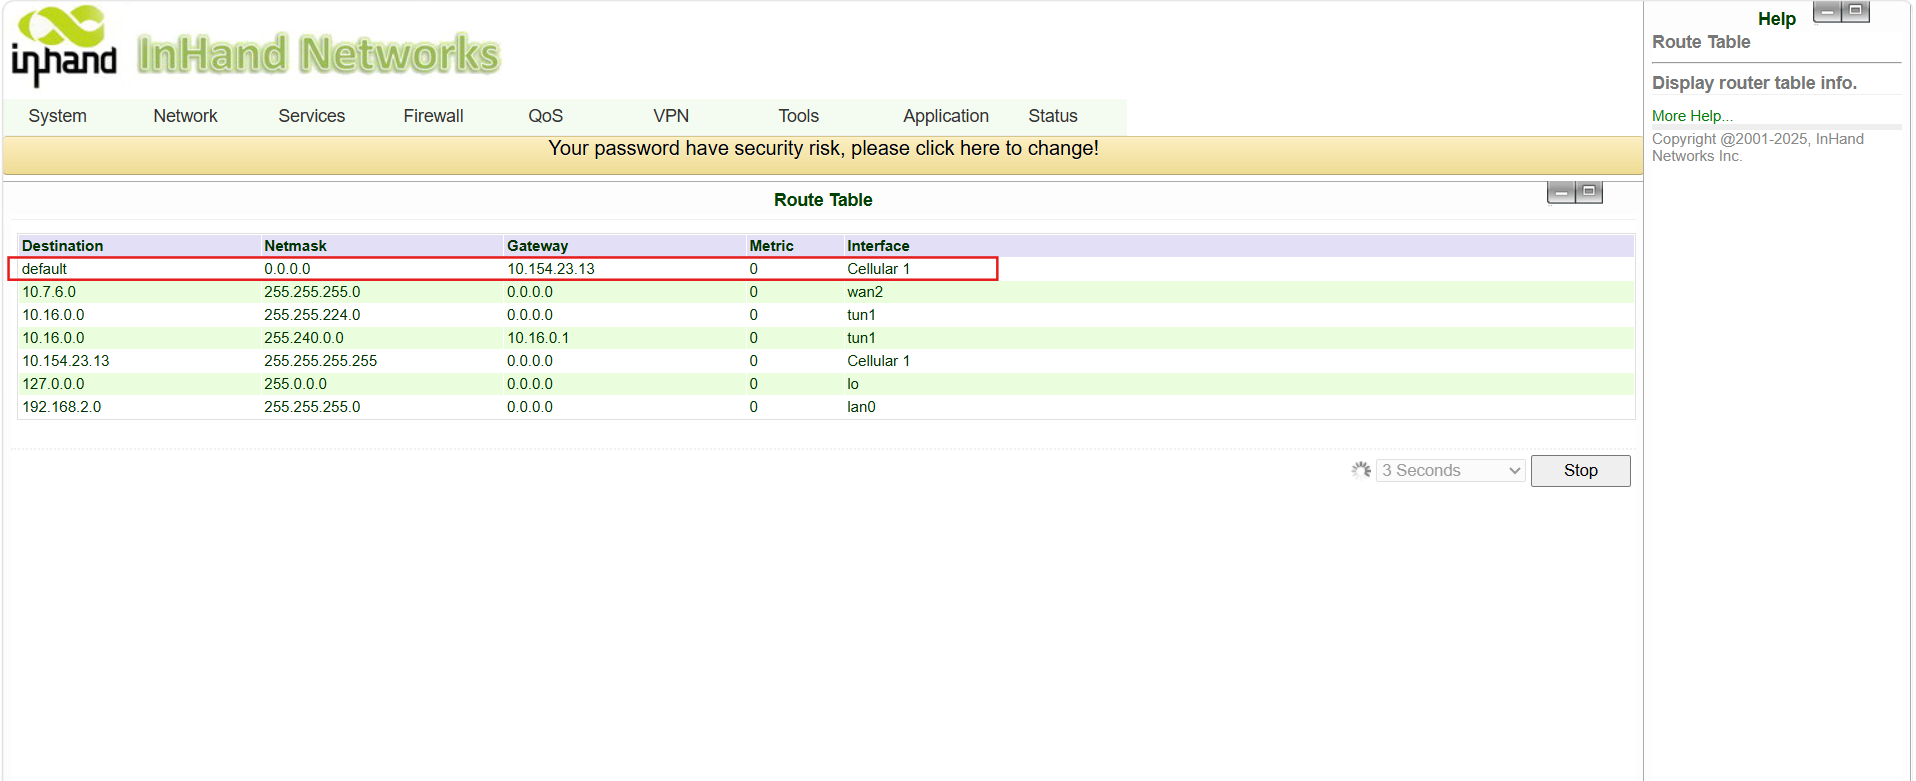
Test the failover by simulating a main-link outage:
- Disconnect the Ethernet cable from the
WAN/LANport (or pull the upstream ISP cable). - Wait a few seconds for the ICMP probes to declare the WAN link down.
- Go to Status → Route Table.
- The default route should now point to the Backup Link (cellular). All outbound traffic from the LAN device is now going through 4G.
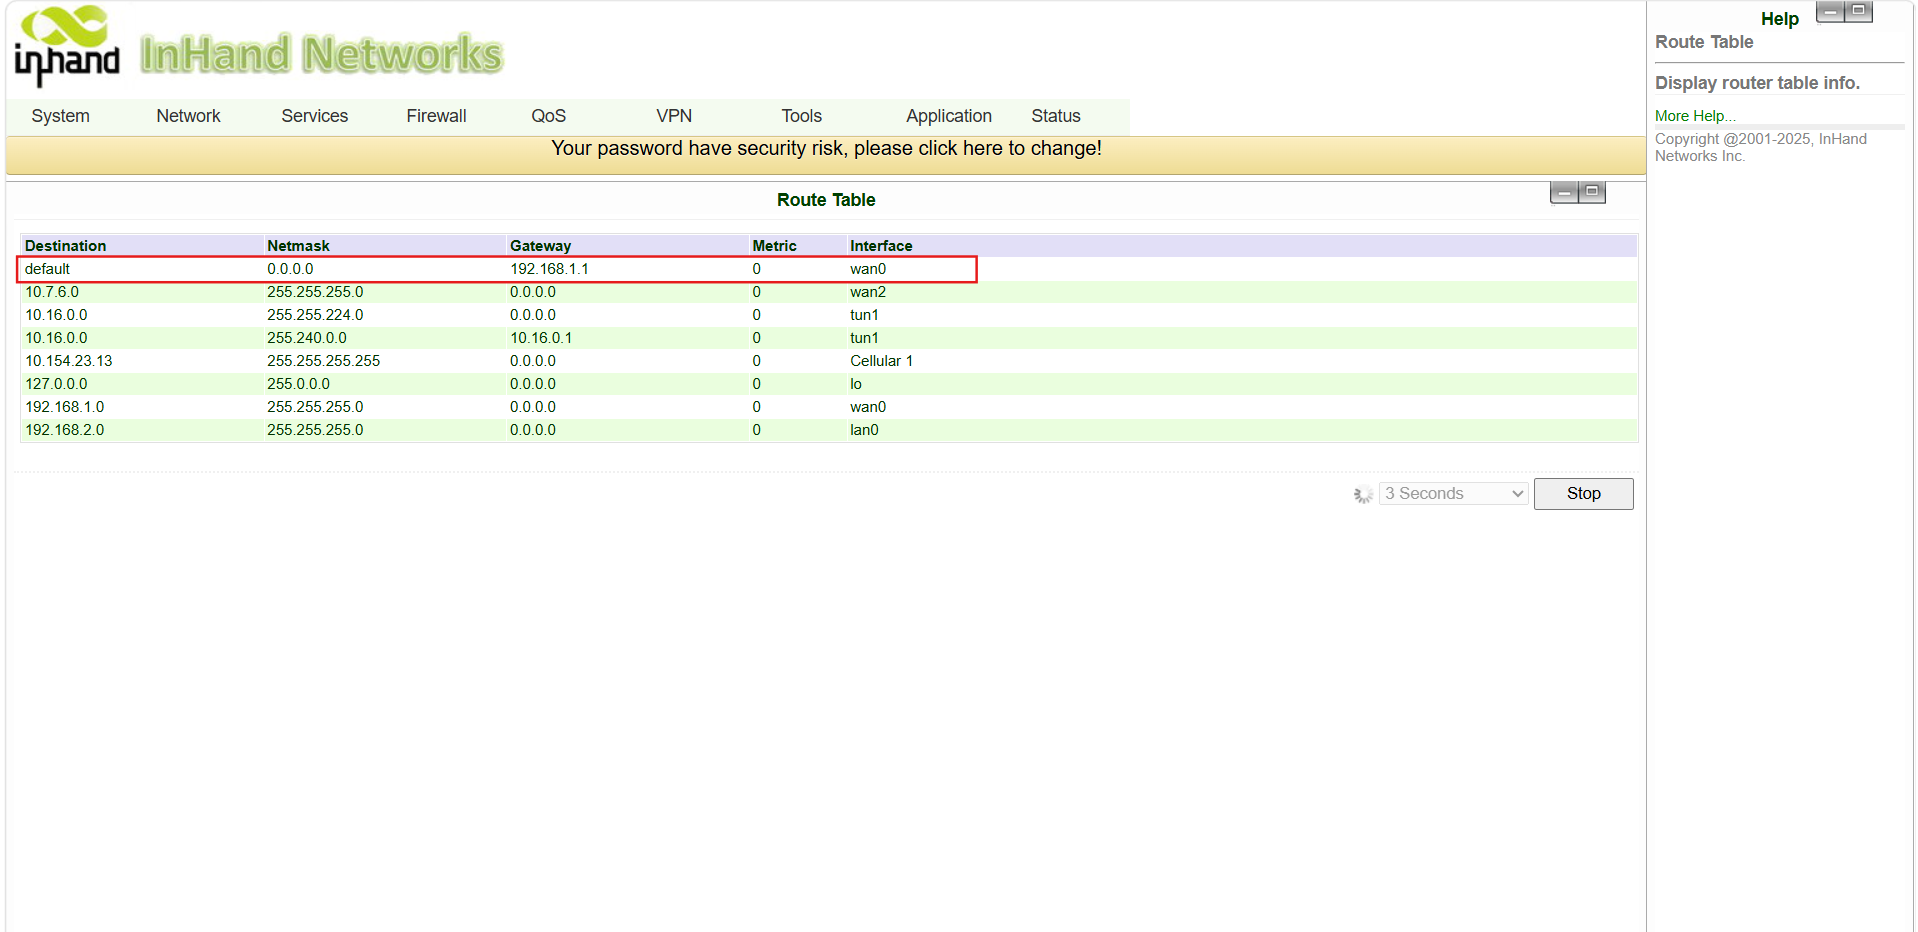
8.1 Test fallback
- Reconnect the Ethernet cable to the
WAN/LANport. - Wait for the WAN to come back online and pass the ICMP probe.
- Go to Status → Route Table again.
- The default route should automatically switch back to the Main Link (WAN). No manual action required.
9. Optional — Hardening & Operations
9.1 Change the default Web password
- Go to System → Admin Access (or System Settings → Management).
- Enter the username, old password, and a new strong password.
- Apply and save.
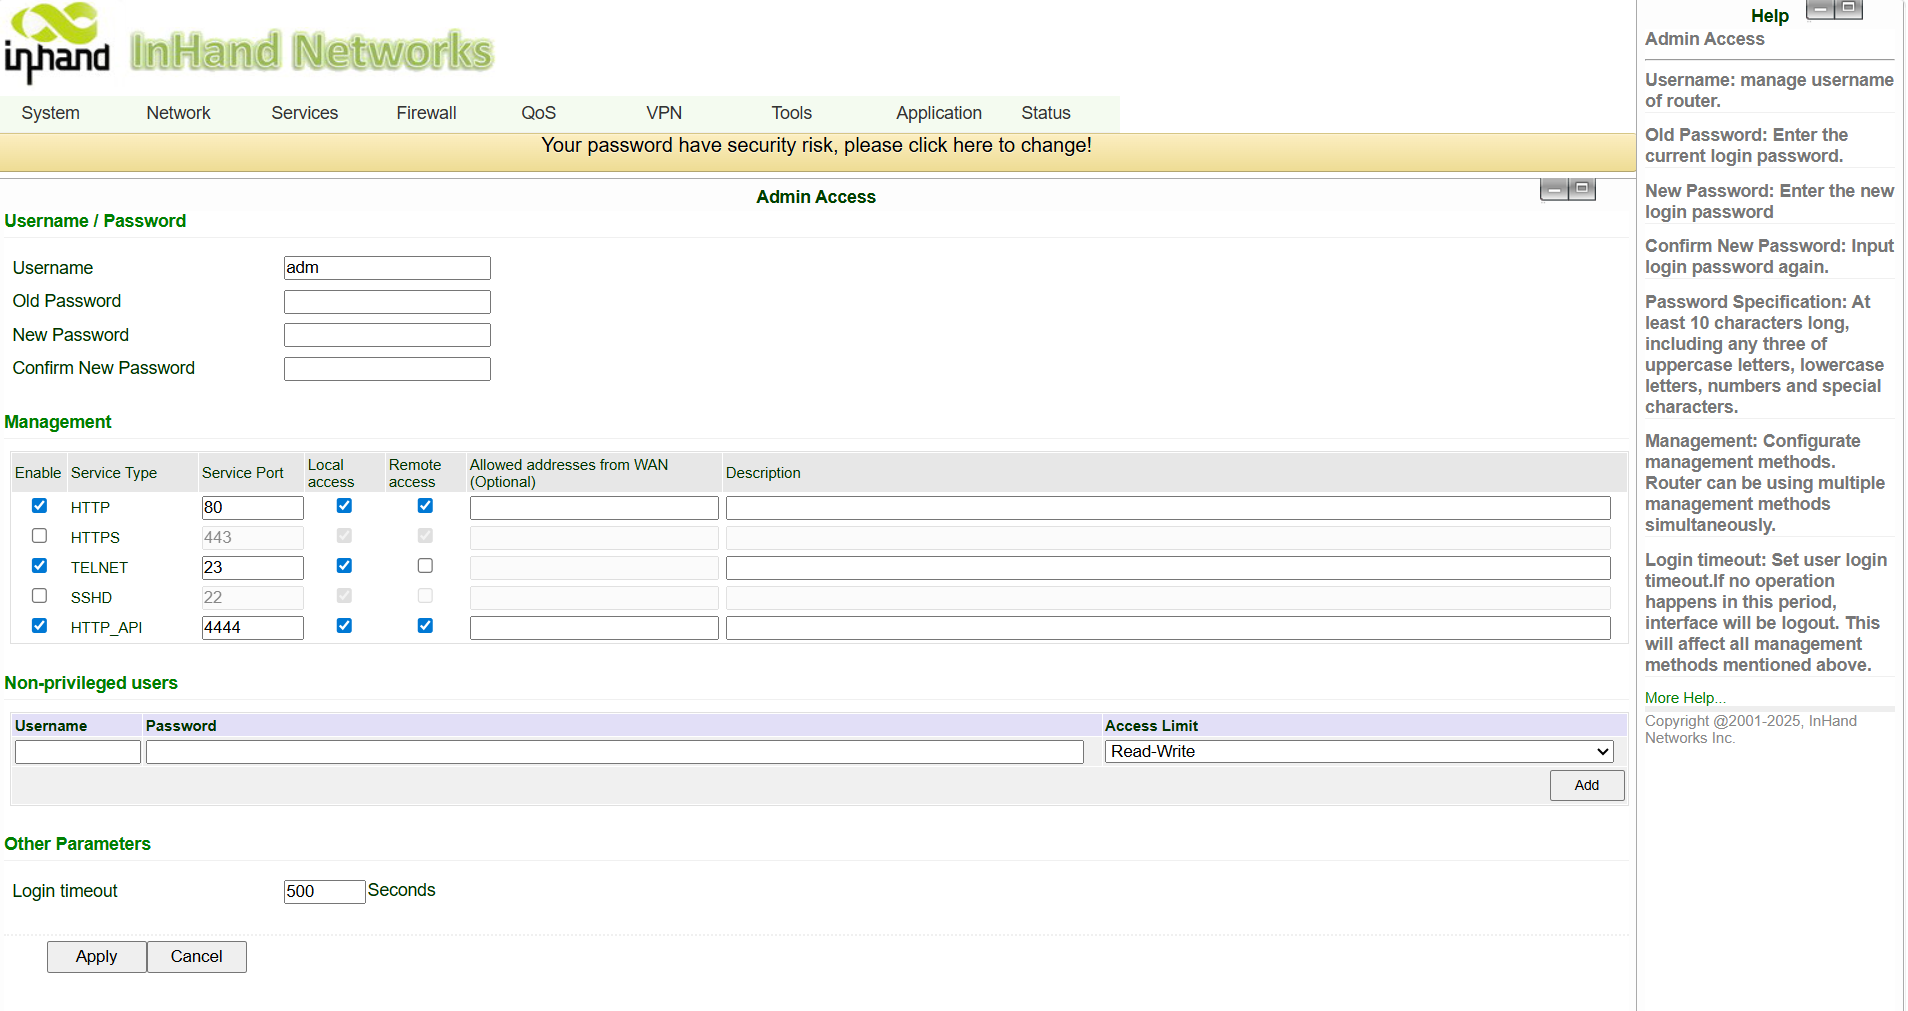
9.2 Restrict / open remote management
- Go to System → Admin Access.
- In the Management section, choose the service type (HTTPS / SSH), the port, and whether to allow Remote (WAN) management.
- Apply and save.
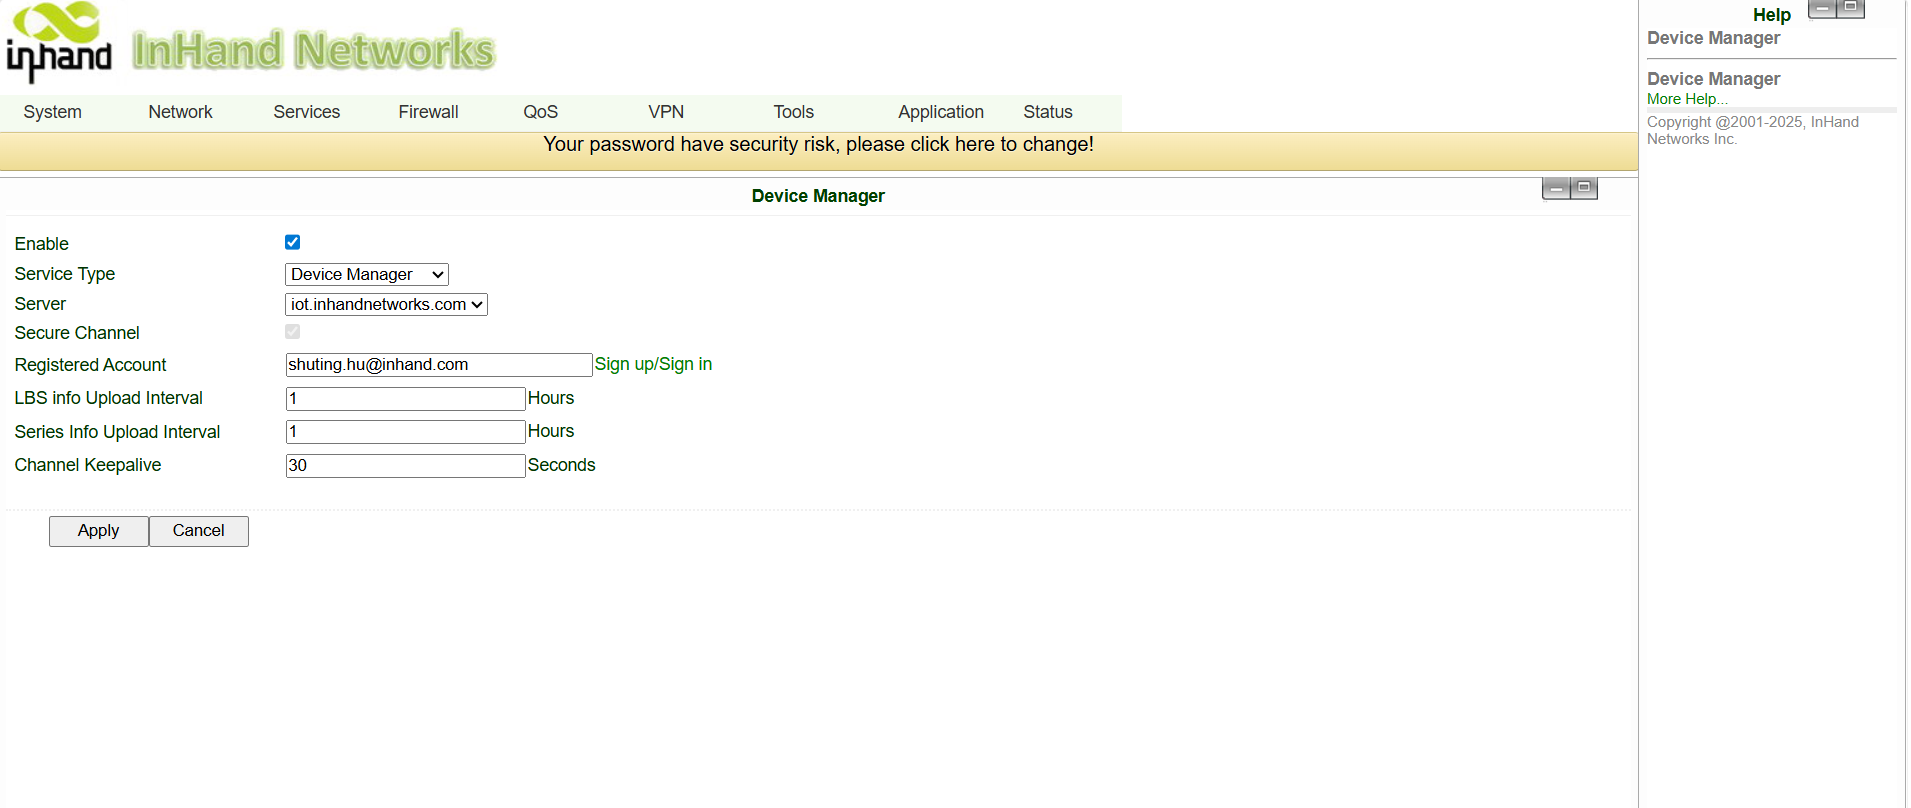
9.3 Enable Device Manager (cloud O&M)
- Go to Services → Device Remote Management Platform.
- Tick Enable.
- Service type: Device Manager.
- Server: choose China or International based on your project region.
- Account: your registered InHand Device Manager account.
- Apply and save.
9.4 Backup the configuration
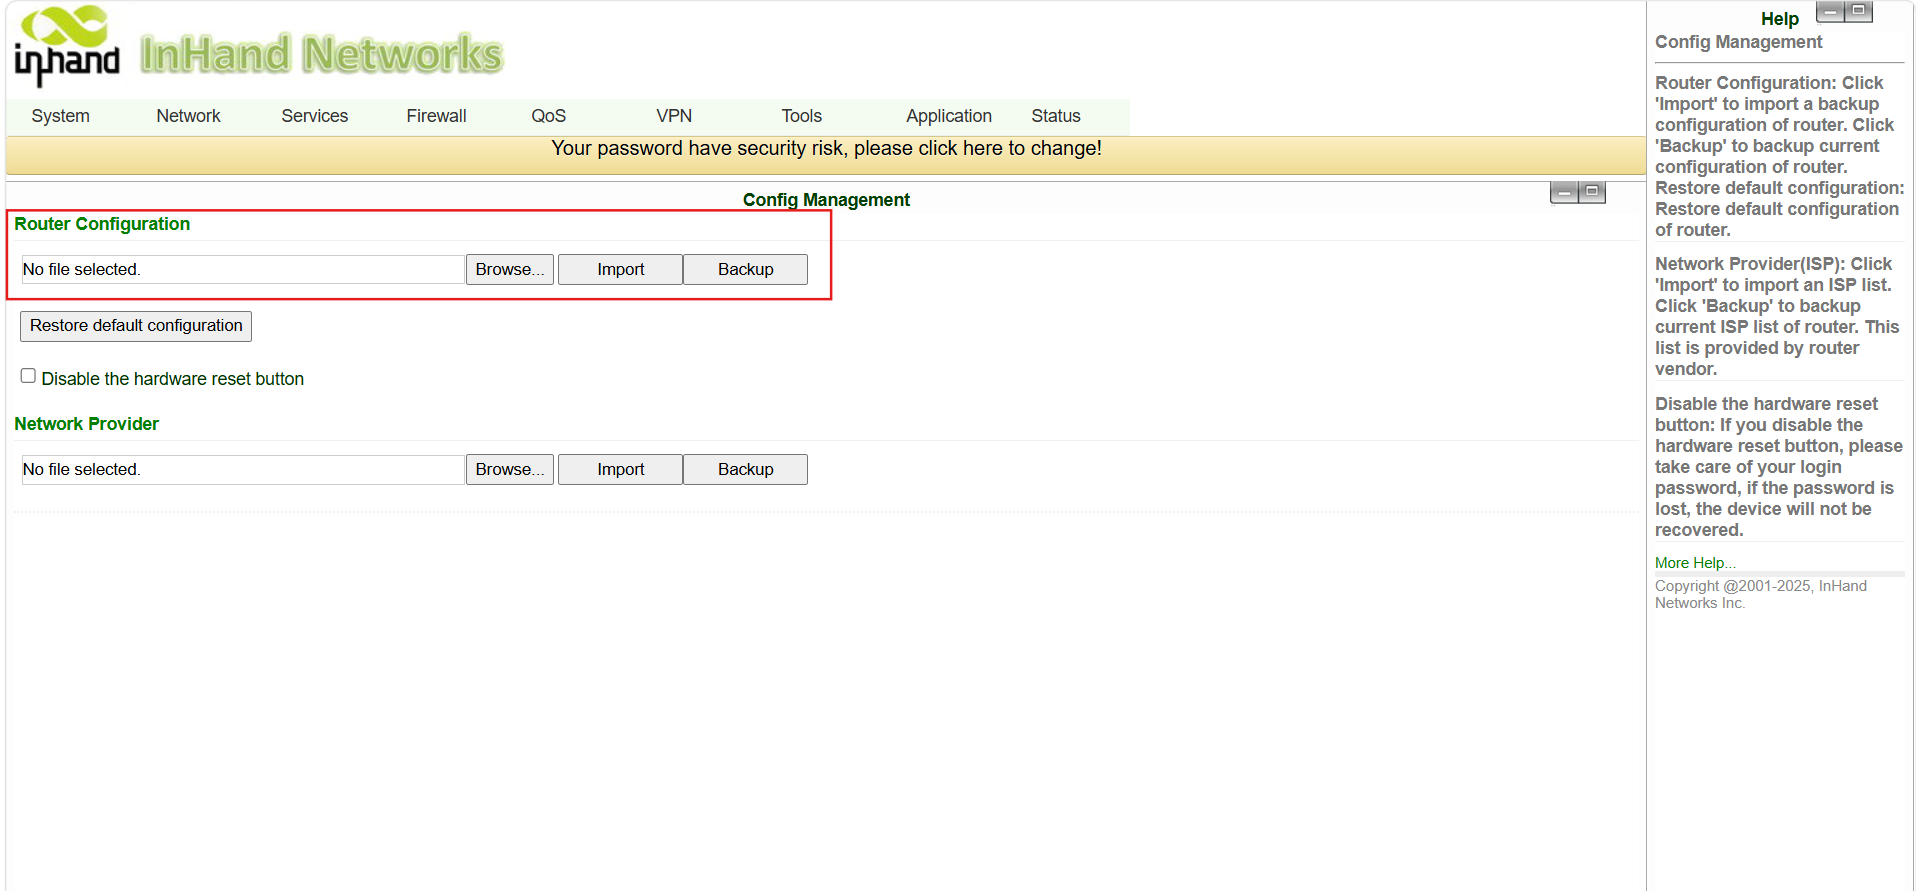
- Go to System → Configuration Management.
- In Router Configuration, click Backup to download a backup file.
- To restore, click Import Config and reboot to apply.
10. Troubleshooting
| Symptom | Check |
|---|---|
| Cannot open the Web UI | Same subnet as 192.168.2.1? IP conflict? Cable OK? Try a factory reset. |
| Cellular cannot dial up | SIM seated? APN correct (for private SIMs)? Signal value ≥ 21? |
| WAN does not come up | Cable in the WAN/LAN port? Port set to WAN mode? Correct IP mode (DHCP / Static / PPPoE)? |
| Wi-Fi STA does not connect | Wi-Fi set to STA (not AP) mode? Correct SSID / password? Signal strong enough? |
| Failover does not happen | Is Link Backup → Enable ticked and applied? Is the ICMP target reachable from a known-good link? Is the SIM whitelisted to reach 8.8.8.8? |
| Fallback to main does not happen | Is the main link actually passing the ICMP probe? Try pinging the target from the WAN side. |
| Both links online but traffic stuck on backup | Check Status → Route Table — the default route should match the active link. Re-apply Link Backup config. |
| Signal OK but cannot reach the server | LAN device gateway / DNS set correctly? SIM whitelist allows the server endpoint? |
11. Safety Notes
- Ground the device properly on industrial / outdoor / vehicle sites.
- Do not hot-plug serial cables while powered.
- Back up the configuration after every change.
- Change default passwords periodically.
- Only authorized personnel should operate the gateway.